Introduction #
An HTML email is an email message that includes HTML (Hypertext Markup Language) code to format and style the content of the email. Unlike plain text emails, which contain only text characters, HTML emails can include various elements like images, links, tables, colors, fonts, and formatting to create visually appealing and interactive email content. They allow senders to create rich and engaging email content that can include branding elements, multimedia, and clickable links.
Key characteristics and components of HTML emails: #
- HTML Markup: HTML emails use HTML tags and attributes to structure and format the content. This includes headings, paragraphs, lists, tables, and more.
- CSS (Cascading Style Sheets): CSS is often used in conjunction with HTML to style the email’s content. CSS can control the appearance of text, fonts, colors, borders, and layout.
- Images: HTML emails can include images, such as logos or product images, which are embedded within the email or hosted on a web server and linked to in the HTML code.
- Links: Hyperlinks can be added to HTML emails, allowing recipients to click on text or images to navigate to webpages, documents, or other online resources.
- Interactive Elements: HTML emails can include interactive elements like buttons, forms, and JavaScript functionality, although some email clients may limit the use of JavaScript due to security concerns.
- Responsive Design: To ensure that HTML emails display correctly on various devices and screen sizes (e.g., desktop computers, tablets, smartphones), responsive design techniques are often employed.
How does it work? #
- HTML Markup: The HTML markup is the core of the email’s structure and content. It consists of HTML tags and elements that define the layout, formatting, and organization of the email’s content. Common HTML elements used in HTML emails include:
<html>: The root element that contains all other elements in the HTML document.<head>: Contains meta information, links to external resources (like CSS stylesheets), and other non-visible elements.<body>: Contains the visible content of the email, including text, images, and links.<table>: Often used for creating complex layouts in HTML emails, as email clients have varying levels of support for CSS layout techniques. Tables are used to structure email content into rows and columns.
- Text Content: HTML tags are used to structure and format text content within the email. Common text-related tags include:
<p>: Defines paragraphs.<h1>,<h2>,<h3>, etc.: Define headings of various levels.<ul>and<ol>: Create unordered (bulleted) and ordered (numbered) lists, respectively.<li>: Define list items within lists.
- Images: Images can be included in HTML emails using the
<img>tag. Images can be hosted externally on web servers and linked to in the email or embedded within the email itself using base64 encoding.<img src="https://example.com/image.jpg" alt="Image Description">
- Links: Hyperlinks are added to HTML emails using the
<a>tag. These links can point to websites, documents, or other online resources.<a href="https://example.com">Visit our website</a>
- Styling with CSS: CSS (Cascading Style Sheets) can be applied to HTML emails to control the appearance of text, fonts, colors, margins, padding, and layout. Preferably CSS can be included inline (within HTML tags), or embedded within a
<style>tag in the email’s<head>section.
- Interactive Elements: HTML emails can include interactive elements like buttons and forms, allowing recipients to take actions directly within the email. JavaScript can be used for interactivity, but it’s important to note that many email clients block or limit the use of JavaScript for security reasons.
- Responsive Design: Media queries in CSS can be used to create responsive HTML emails that adapt to different screen sizes and devices. This ensures that the email displays correctly on desktop computers, tablets, and smartphones.
YouTestMe HTML email template explanation #
The image below shows the template and below the image, you can find an explanation of how to edit each part mark in the image. Also, we attached the template which you can download and use to customize it per your needs. The template can be found in this section.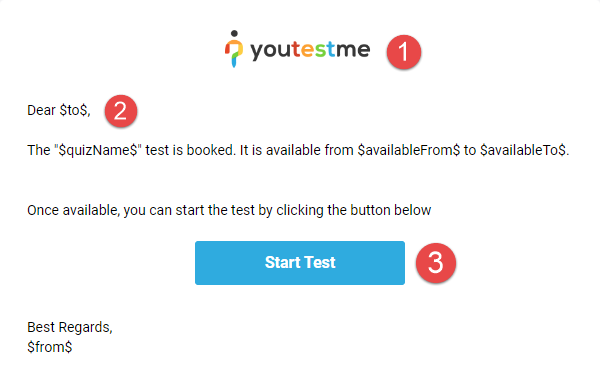
- You can change or remove the logo from the HTML email. Logo is an <img> tag with a src=”” attribute and it can be found in the first body table of the email.

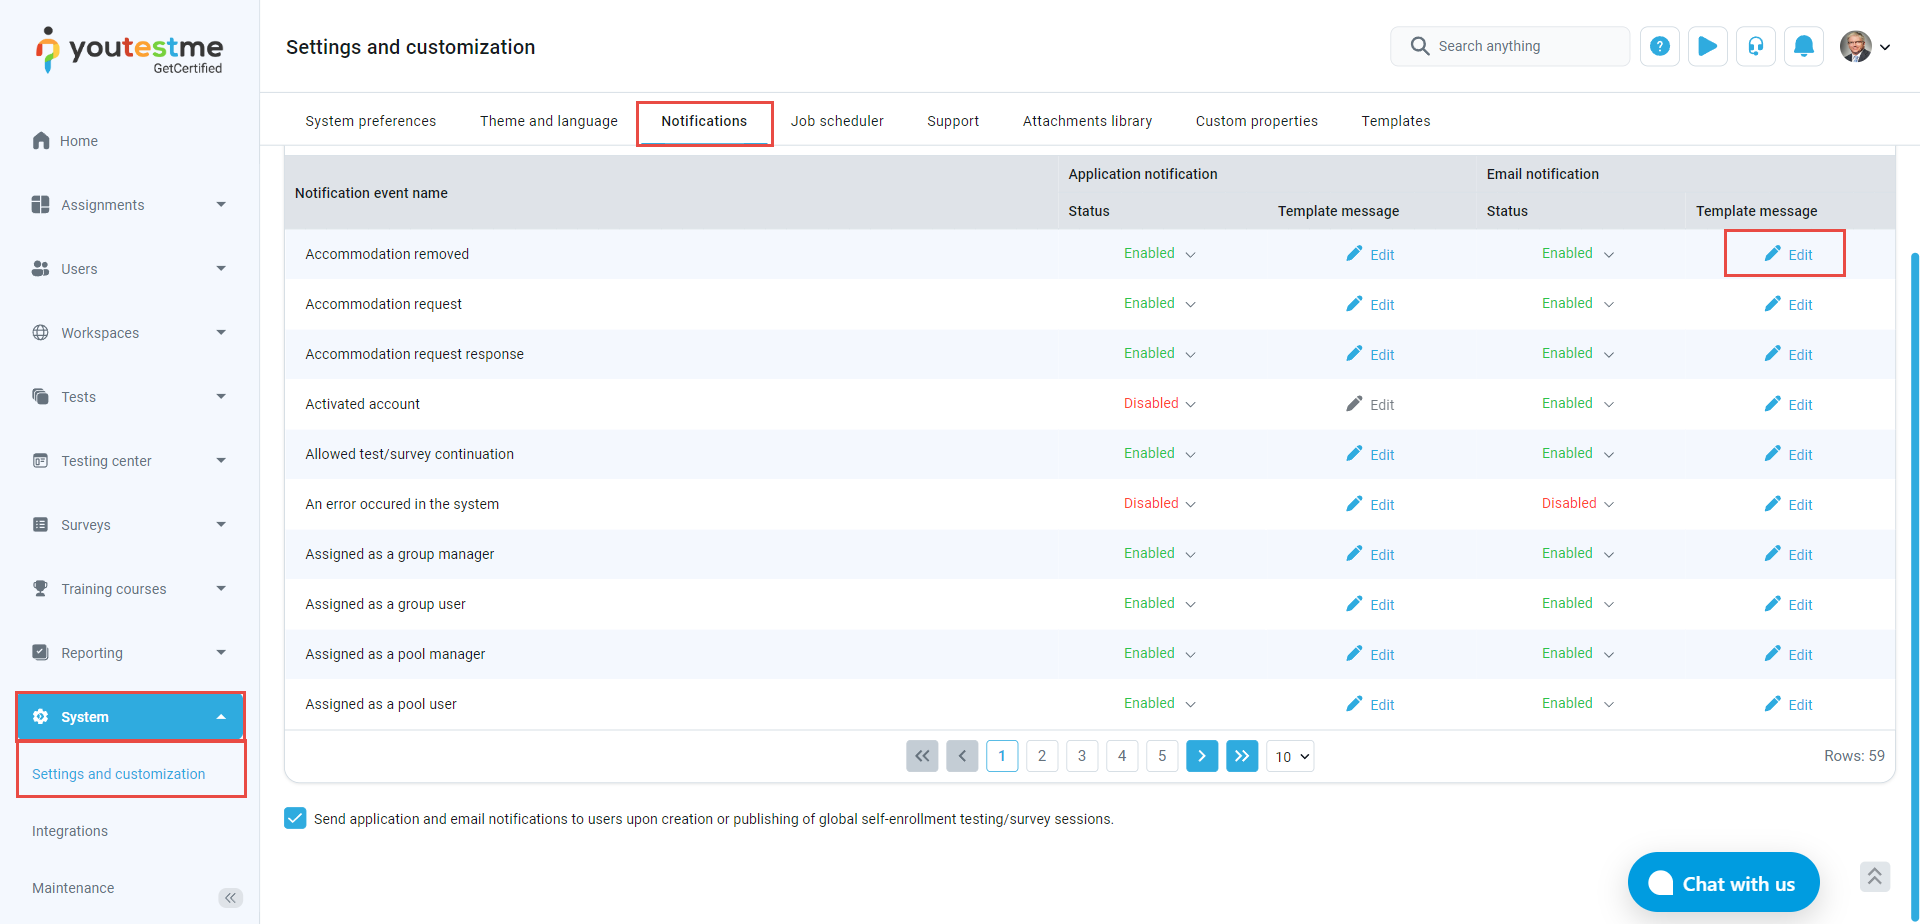
- In the example above, you can see $to$ text. This is the variable that can be used for the system to automatically assign the username of the person who receives email. Each notification contains its own set of variables that you can use. You can see available variables by opening “Settings and customization” under the “System” menu, opening the “Notifications” tab, and clicking “Edit” for notification you would like to edit.

- Then after pressing the “Edit” button a popup window will appear that will display the notification and its contents of available variables:
- Then after pressing the “Edit” button a popup window will appear that will display the notification and its contents of available variables:
- Redirection button is an (<a> “anchor” or a “link” element) that is styled to look like a button. Email Apps and providers restrict the use of JavaScript to reduce the chances of inflicting users with Malicious Software that could be displayed to look as a button. The button also contains a variable that is listed in the “Edit email template”.


How do I edit an HTML email to suit my needs? #
First, we recommend to download the “Notepad++” using this link.
We prepared a template which you can download and edit to suits your need. Once you download the file, you can just right click on it, and click “Edit with Notepad++”

Simplified HTML email will be made from 4 sections (you can add more sections to it or remove them for your customized template).
- The first section of the HTML email will contain a header-like structure that will display your Logo as shown previously
- You can change the size of the image by changing the width or adding a height attributes to the <img> element.
- The second section will contain the text of the notification

- You can divide text using <br> tags and change: Font style, Font weight, Font color, etc…
- The third section is where the button is located
- You can change the button’s height, width, color, border radius, Font size, Font color, etc…
- Note: The <a href=”$directLink$”> is where the redirection will lead. Make sure to always check if your redirection is set up correctly!
- The final footer-like section of the HTML email


Once you edit the HTML file, you should copy the whole code and paste it in the email notification following this procedure:
- Open the email notification which you would like to edit.
- Click the “Source” option to open an HTML preview of the notification.
- Select the whole existing text, delete it, and paste the HTML code you previously saved.
- Click the “Save” button to confirm changes.
Note: It is not possible to edit the notification through the “Source” view, but each time, you must edit the HTML file, and just copy the changes and paste them in source. We suggest you to test the notification after you complete the process.


