This article explains the registration process in YouTestMe, which can be approached in two different ways depending on whether the self-registration option is enabled or disabled. Understanding the benefits of each option will help you make an informed decision about how to manage user access effectively.
How to register when the Self-registration module is enabled #
Users can register their accounts without needing the administrator’s approval if the Self-registration option is enabled.
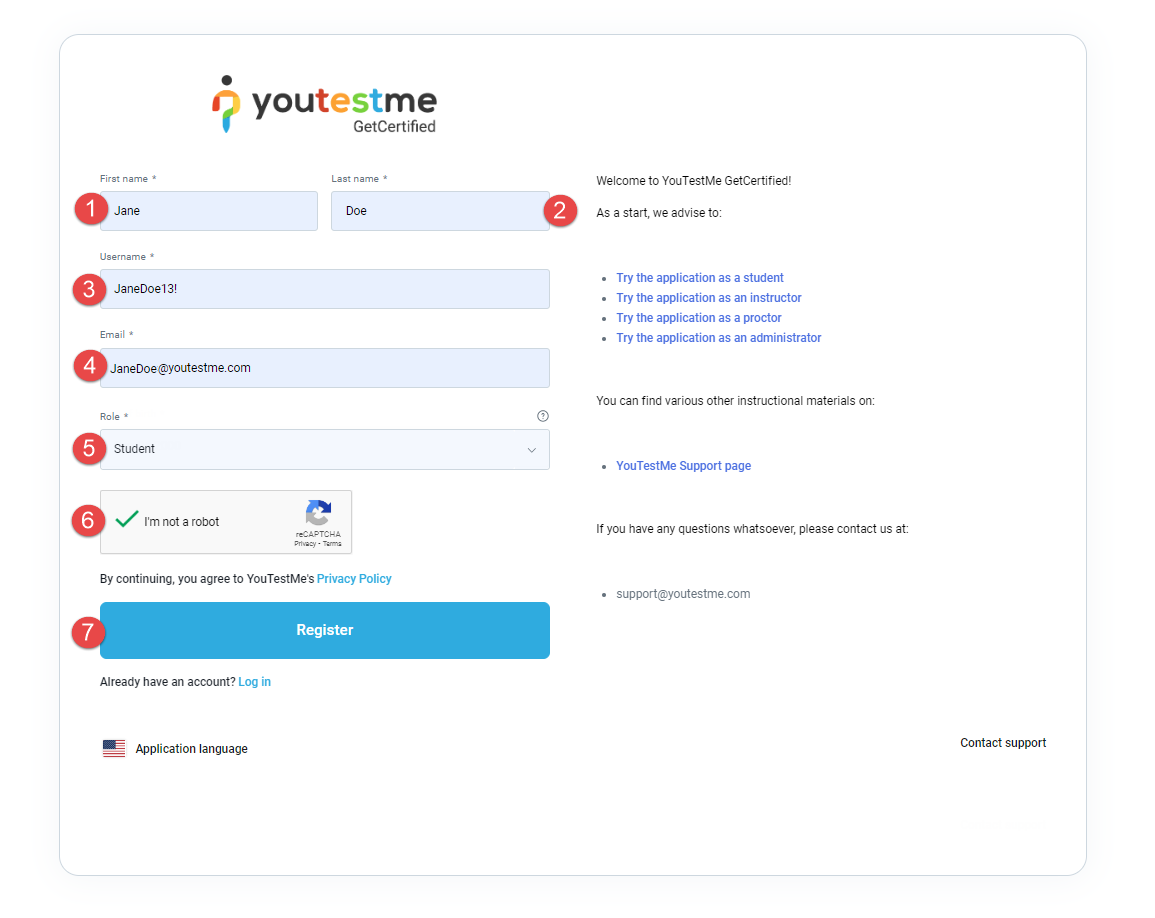
On the login page, click the Create an account option.

The registration form will show up, and you need to fill in all the necessary information:
- Enter your first name.
- Enter your last name.
- Enter the username you are going to use.
- Enter your email address.
- Select preferred role.
- Captcha verification is a security measure that requires users to prove they are human and not automated bots.
- Click the Register button to register as a YouTestMe GetCertified user.
 After completing the registration process, the user will be automatically redirected to the application and will receive an email confirming the creation of their new user profile. We recommend changing the password after the first login:
- Go to the View profile page.
- Click on the Information tab.
- Access Password settings.
- Click the Change password button to update password.

Benefits of Enabling Self-Registration:
- User-Friendly: Users can easily sign up on their own, saving time and effort.
- Quick Access: Users can start using the system right away, no waiting required.
- Flexible: Anyone can join.
- Grows Easily: Makes it simple to expand the user base without admin involvement.
How to register when the Self-registration module is disabled #
Users will fill in all the mandatory fields in the same way as explained in the previous chapter. However, after clicking the Register button, they won’t be directed to the application. Instead, they will see a notification confirming that the registration request has been sent to the administrator. The administrator can approve or decline registration request. If the request is approved, user will receive an email notification that the account has been created.

If the request is declined, user will also receive an email notification.
Benefits of Disabling Self-Registration:
- More Control: Admins have full say on who gets access, boosting security.
- Verified Users: Admins can check and approve users, ensuring quality.
- Customizable: You can design specific registration processes as needed.
- Compliance-Friendly: Ideal for systems with strict rules or authorization requirements.
Approve/decline registration requests (admin’s perspective) #
When the self-registration module is disabled, administrators have the option to decide which users to approve or decline for registration requests. The first method is directly from the User profiles page:
- Access User profiles on the Users page.
- Navigate to the Registration requests tab.
- Select the users they want to approve for registration.
- Click the Approve button to finalize the process.

Another way to handle registration requests is to:
- Click on Notifications in the top right corner.
- Approve or decline the newly received registration request.

In conclusion, this article offers a straightforward guide to the YouTestMe user registration process, highlighting the significance of self-registration settings and how they impact user access management.


