- Creating a new workspace
- User organization
- Workspace editing
- Adding training courses, surveys, or tests to a workspace
- Report on Workspace Activities
- Global admin vs. Workspace admin view
- Choosing a workspace
This article explains how to create workspaces and assign members to them. Workspaces serve to separate entities in the system. These entities include tests, training courses, users, user groups, and question categories.
Workspaces are typically used by organizations that need to divide department-specific tests and training courses but also have globally accessible tests.
Example 1 – An organization with multiple departments. The HR department workspace can have onboarding training, job-satisfaction survey, and similar, and the IT department workspace can have tests related to development procedures, but both can have access to the cyber security test that needs to be done by everyone in the organization.
Example 2 – A testing center that works with numerous organizations, each with their own branding and tests.
Creating a new workspace #
To divide users into different workspaces, you need to create them first. To do so:
- Navigate to the Workspaces option in the side menu, then select Manage workspaces.

- Click the Create new button.
- Enter the name of the workspace. The workspace name must be unique.
- Enter the workspace description (optional).
- Click the Save button to save the changes.


User organization #
There are two ways to organize users in workspaces:
- Directly assign user accounts to the desired workspace – To be more specific, you should assign global roles to user accounts during their creation and then assign each user to a workspace with their desired workspace role assigned.
- Grant users access to the workspace based on their role – To be more specific, map global and workspace roles so that users with the selected global role are automatically assigned the appropriate workspace role in that workspace.
Both of these user organization methods will be explained in more detail below.
Direct assignment of user accounts to the desired workspace #
Simplified, these would be the steps:
- Create workspaces (already explained above).
- Create global roles.
- Creating user accounts with the global role assigned.
- Create workspace roles.
- Assigned users to the desired workspaces with the workspace role assigned.
A more detailed explanation of each step will be presented below.
Creating global roles #
The first step in organizing a workspace is to create global roles, which are assigned to users during account creation. Global roles should include all permissions that are not specific to workspace entities, such as users, user groups, tests, surveys, training courses, and question categories. In addition, global roles should provide access to pages relevant to workspace entities.
Specifically, you should enable access to different application parts and later define workspace privileges in the workspace role. This ensures that users can manage workspace entities only in the workspaces where they are members rather than in all workspaces created in the system.
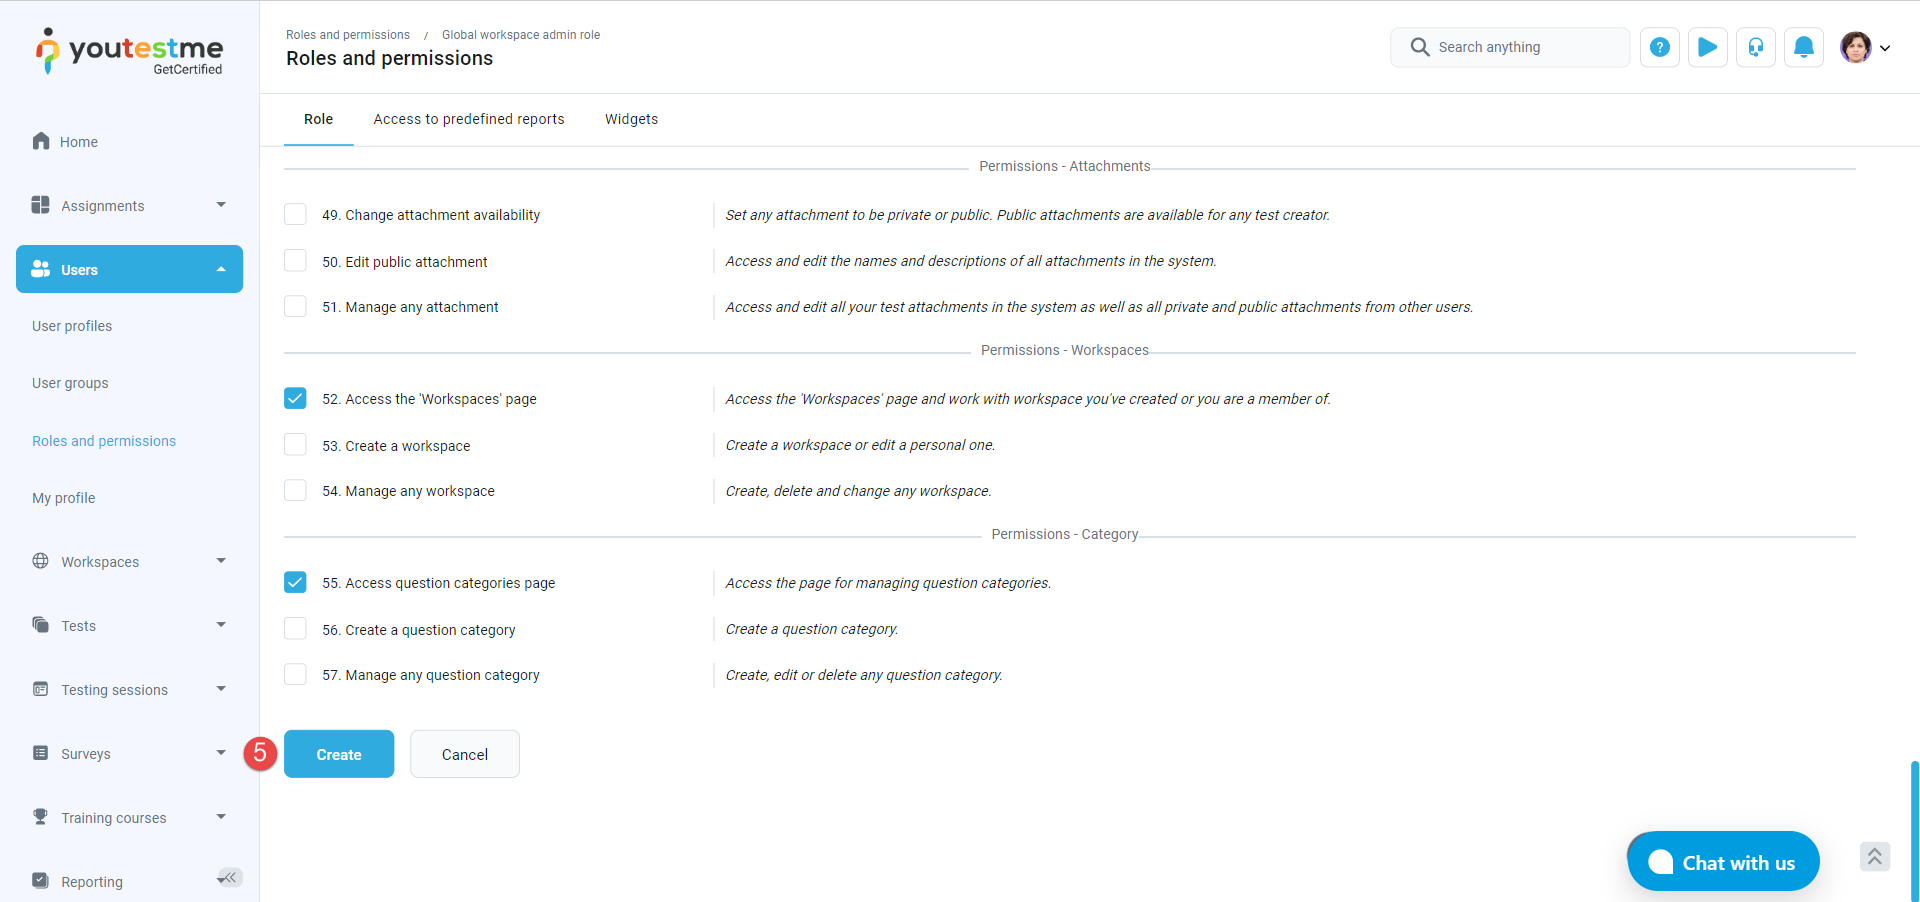
In this example, it will be explained how to create a global workspace admin role first. For this role, we suggest enabling the permissions shown in the picture below:
To create this role:
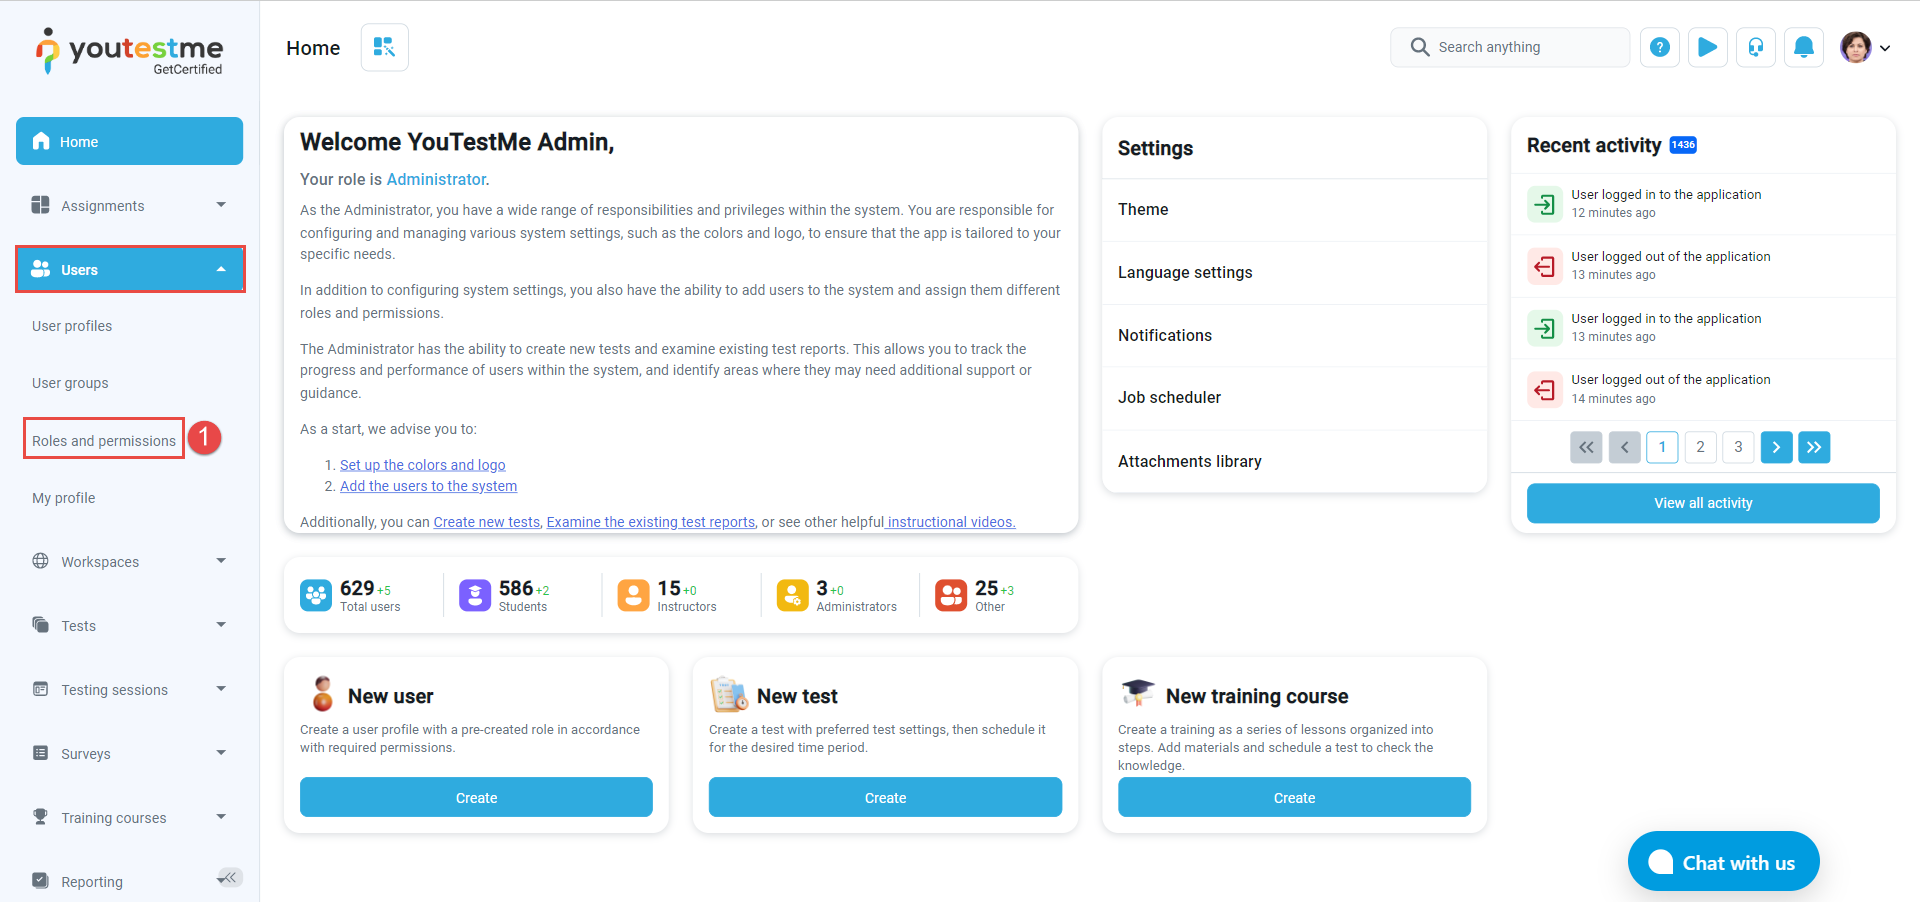
- Navigate to the Users section in the main menu, then select Roles and permissions.
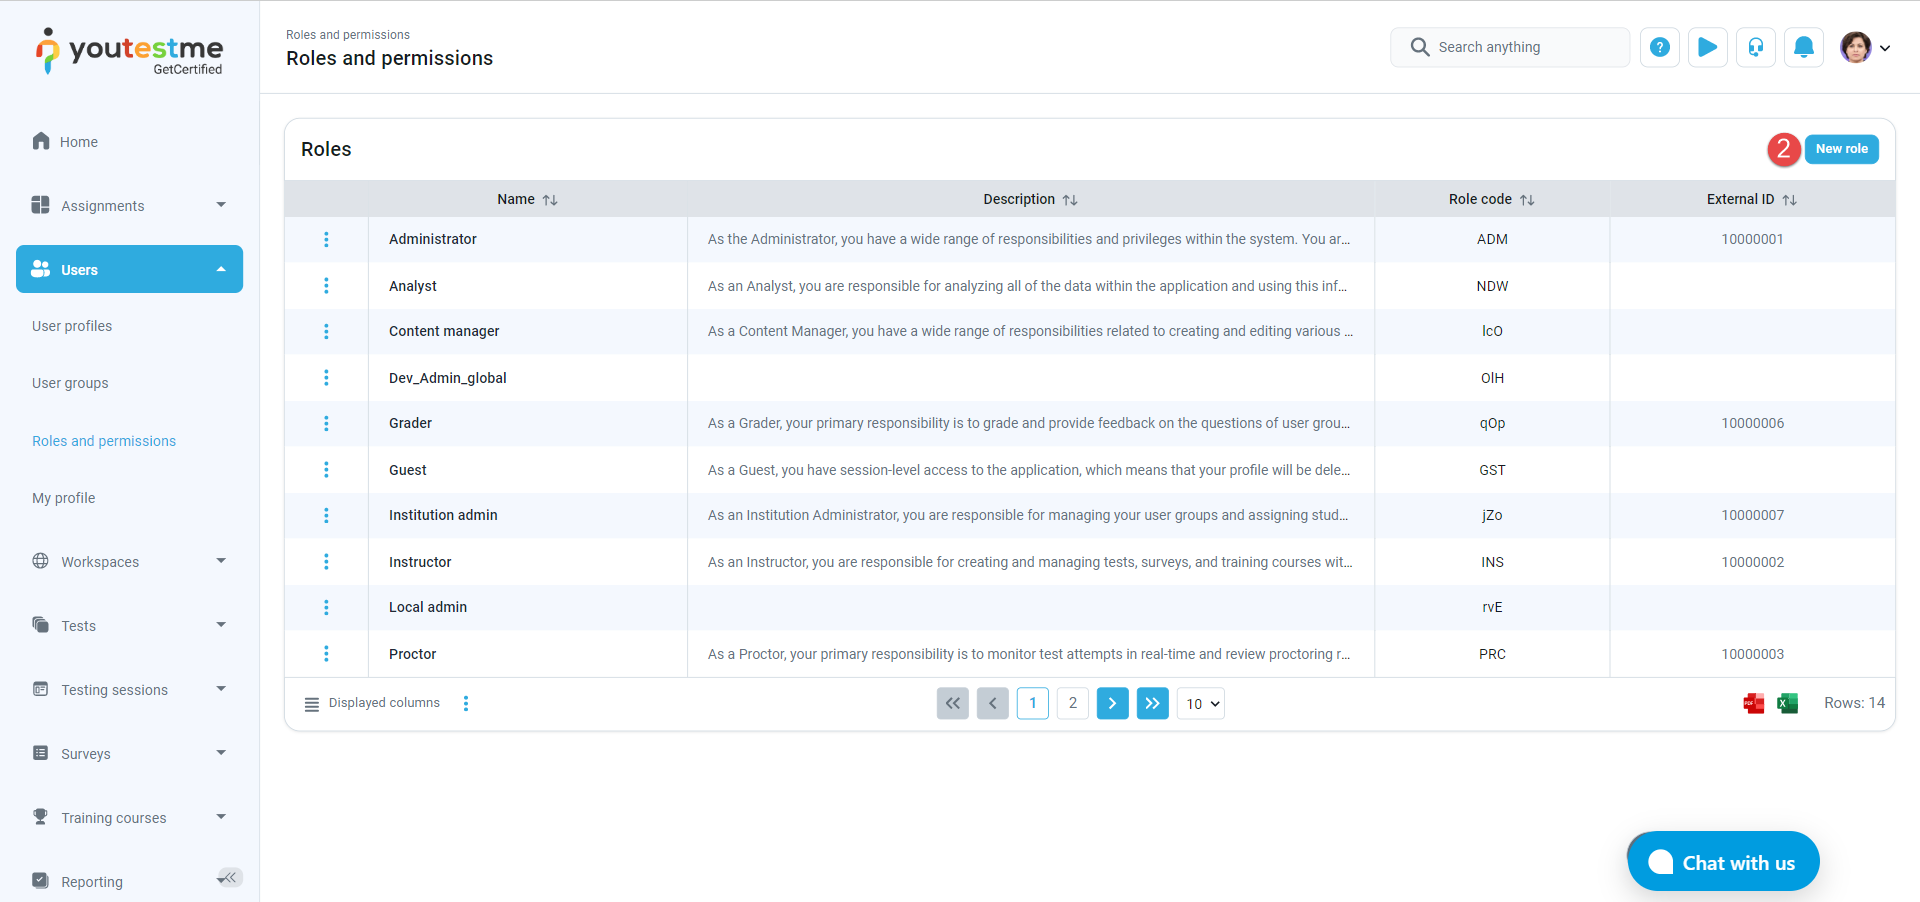
- Click the New role button.
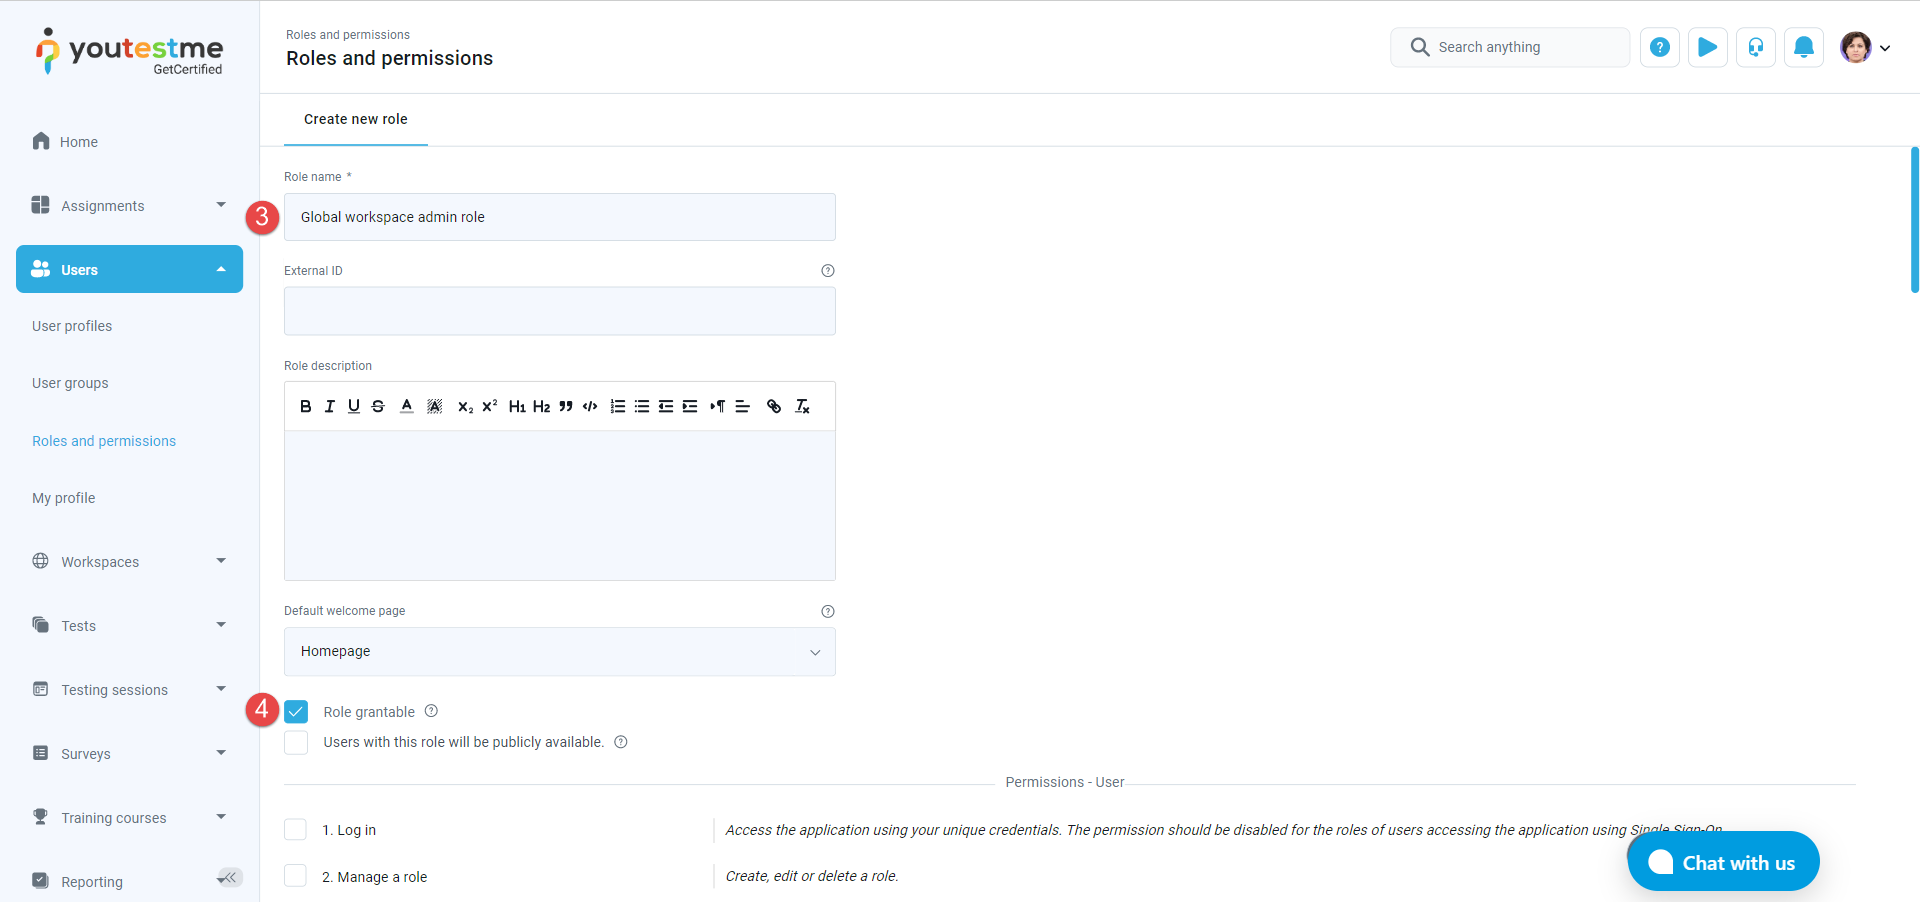
- Define role name. In this example, we will explain global workspace admin role creation.
- Enable the Role grantable option to make this role available for granting to newly created users by any user who has permission to create new users.
- Click the Create button.
Creating user accounts #
For more information about creating a user account, please check this article.
Note that you should assign a previously created global role to the user, which will have access only to the defined application parts.
Creating workspace roles #
Workspace roles permit users to access workspace entities such as tests, question pools, question categories, training courses, users, and user groups. These roles are related uniquely to workspaces and will allow users to do the actions only within their workspace and according to their role permissions.
To create a workspace role:
- Navigate to the Workspaces section in the main menu, then select Manage workspace roles.
- Click the Create new button.
- Enter a role name.
- Choose the desired permissions. In this example, for the workspace admin role, all permissions should be selected.
- Click the Save button.


Assigning users to the workspace one by one #
To assign users to the workspace one by one:
- Navigate to the Workspaces option in the side menu, then select Manage workspaces.
- Click the pencil icon for the desired workspace to which you want to add users.
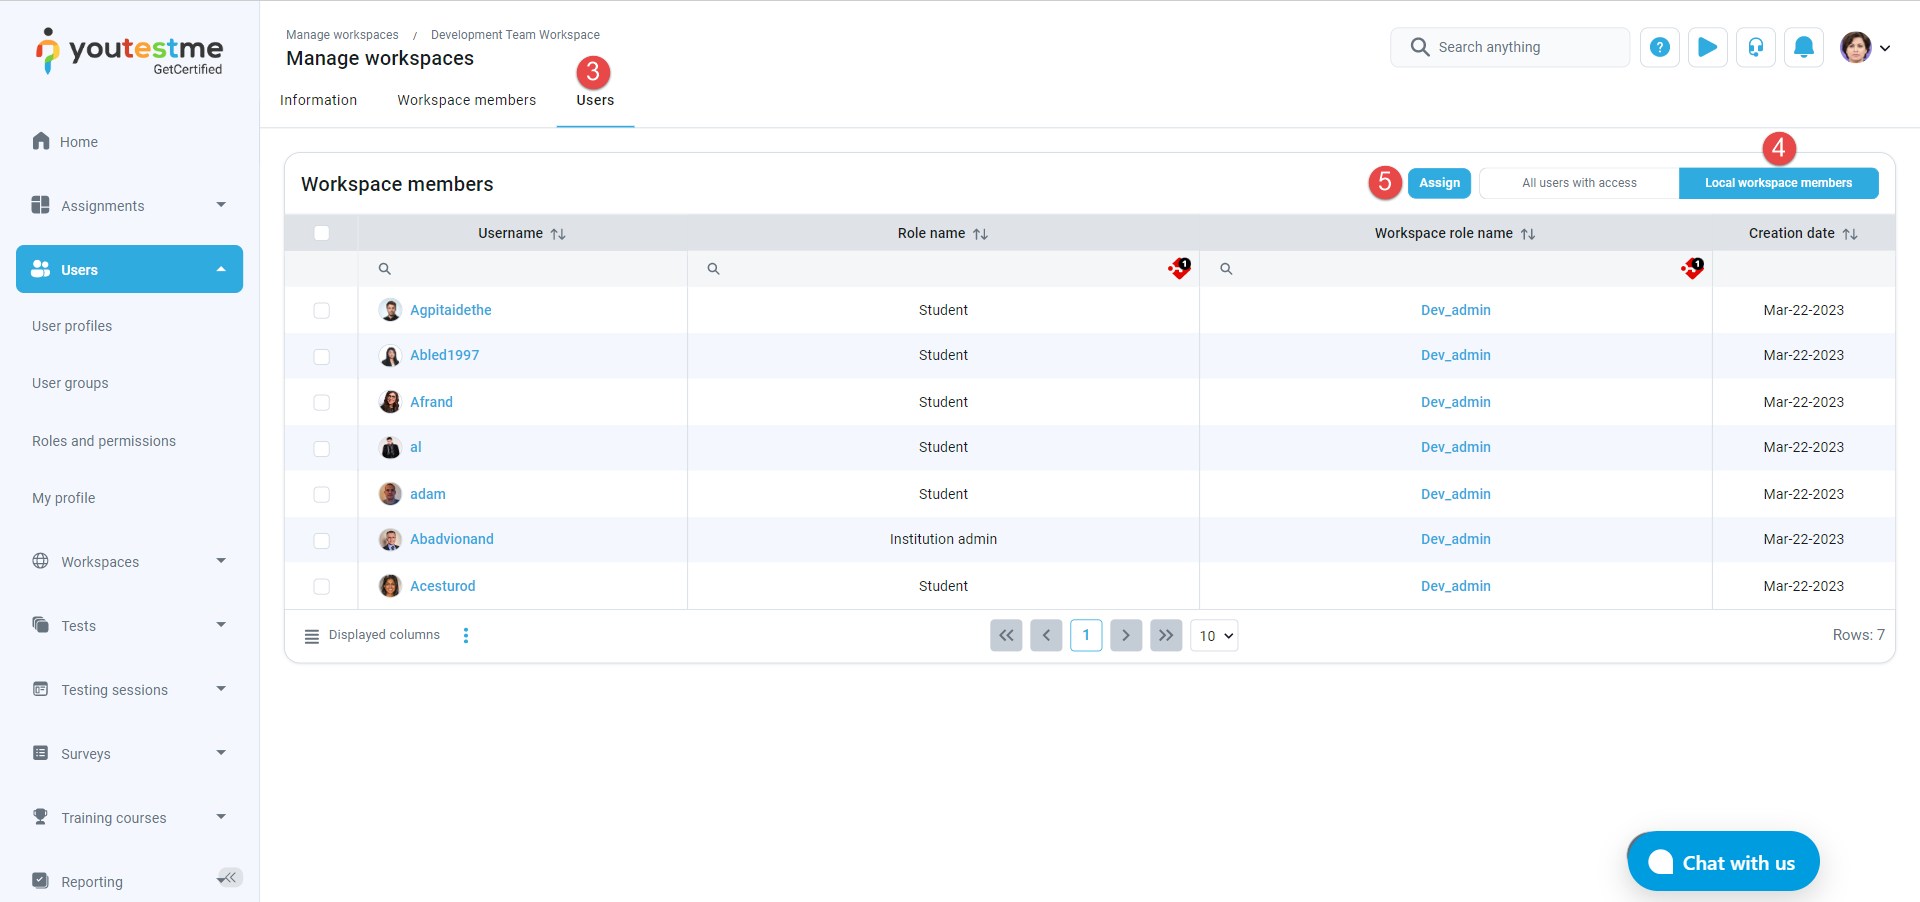
- Navigate to the Users tab.
- Click the Local workspace members view.
- Click the Assign button.
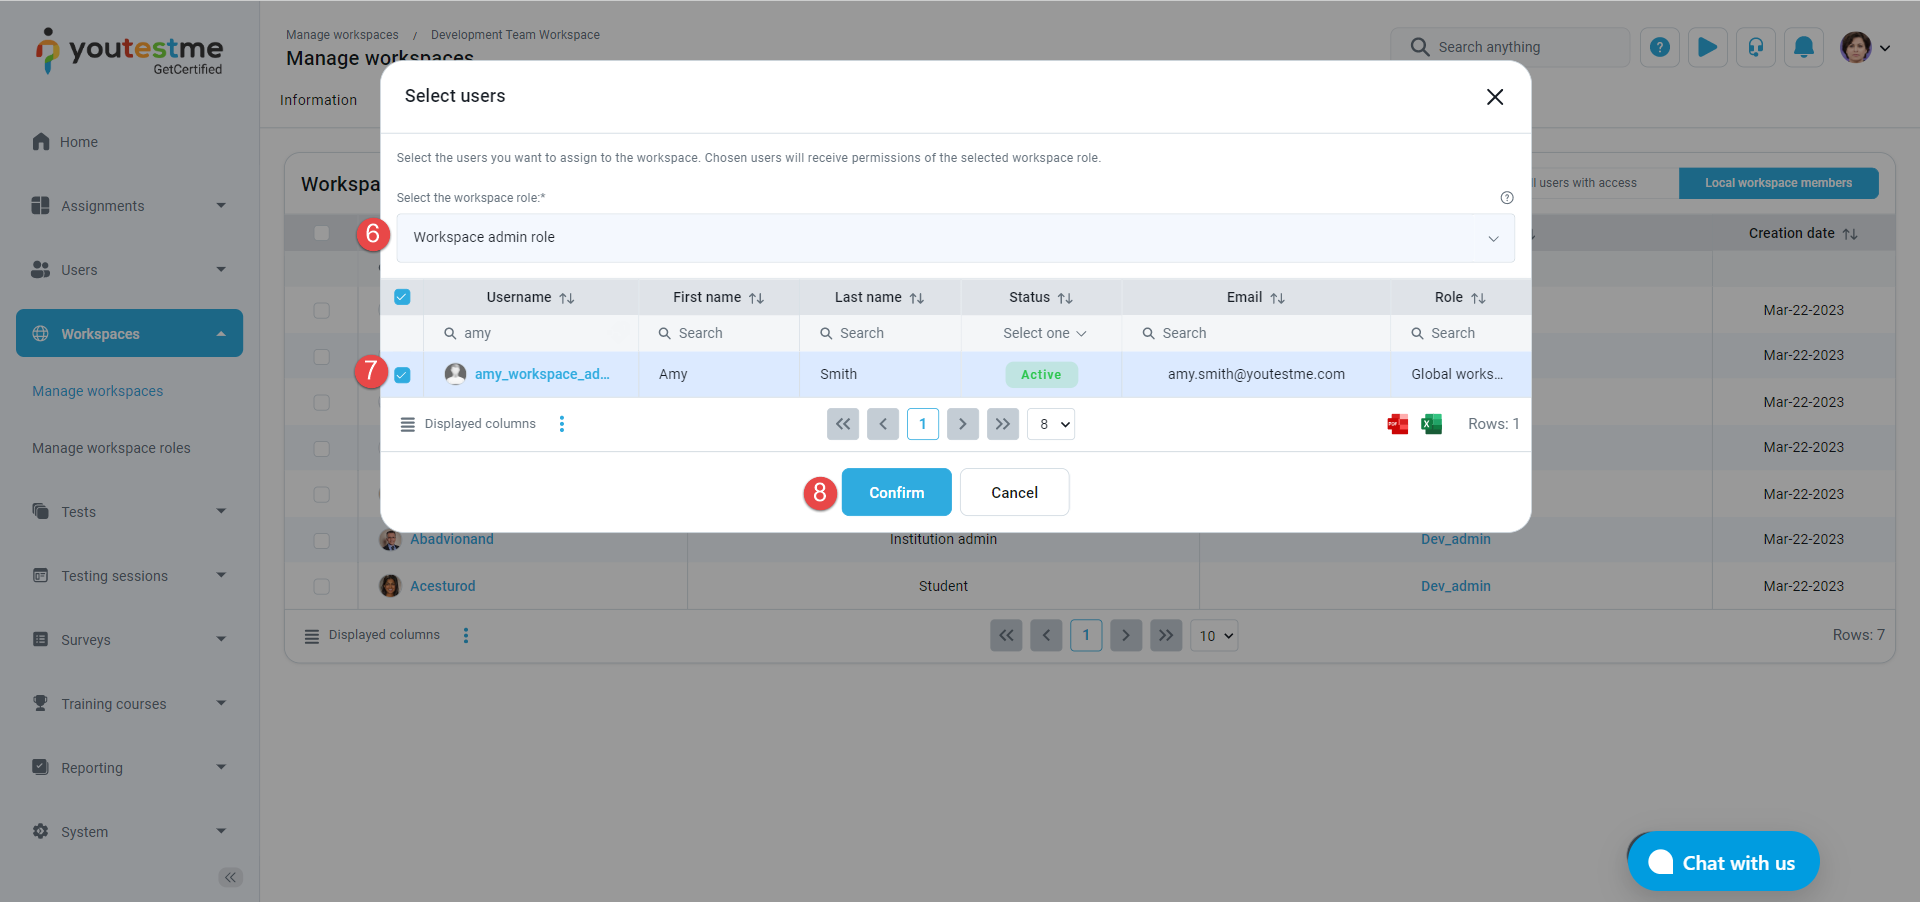
- Select the desired workspace role. Chosen users will receive permissions for the selected workspace role.
- Select the desired users you want to assign to the workspace.
- Click the Confirm button.

Grant users access to the workspace based on their role #
Another way to assign users to specific workspaces is by granting access based on their roles. Simplified, these would be the steps:
- Create workspaces (already explained above).
- Create global roles.
- Create workspace roles.
- Map/Connect global and workspace roles so all users with the selected roles are directly assigned to the desired workspaces.
A more detailed explanation of each step will be presented below.
Creating global roles #
The first step of the workspace organization is to create global roles. Global roles are assigned to users when creating an account, and these roles can later be mapped/connected to workspace roles to assign appropriate permissions within a specific workspace.
For more information on creating global roles, please check the explanation above.
Creating workspace roles #
Workspace roles permit users to access workspace entities such as tests, question pools, question categories, training courses, users, and user groups. These roles are related uniquely to workspaces. Only users with workspace membership can be assigned workspace roles.
For more information on creating workspace roles, please check the explanation above.
Mapping global and workspace roles #
Once you have created all desired roles, you can map them on the workspace level. To do so:
- Navigate to the Workspaces option in the side menu, then select Manage workspaces.
- Click the pencil icon for the desired workspace to which you want to add users.
- Navigate to the Workspace members tab.
- Click the Assign button.
- Select the desired global role which you want to map to the workspace role.
- Select the desired workspace role to which you will map the global role.
- Click the Save button.


In this example, all users who have the Dev_Admin global role will become members of the workspace with the Dev_Admin workspace role. For this specific role and example, this means these users will have all permissions to manage everything within their workspace.
Workspace editing #
To edit the desired workspace:
- Navigate to the Workspaces option in the side menu, then select Manage workspaces.
- Click the pencil icon for the desired workspace to which you want to add users.
Once you select a workspace, you will be redirected to the Information tab, where you can view and change the workspace settings:
- ID – A unique value generated automatically once the workspace is created that can be used to access the workspace with a URL.
- Name – The name of a workspace that can be changed at any time.
- Description – An optional field where additional information can be added.
- Theme – Select one of previously created themes that will be applied to members that set the workspace as current.
- Created by – This field displays the workspace creator’s username. By clicking the username, you will see information about the user.
- Creation date – This field displays the date when the workspace was created.
- Logo – Click the Add logo button to change the default application logo, and members will see that logo when setting that workspace as current.
- Favicon – Click the Add favicon button to change the default application favicon, and members will see that logo when setting that workspace as current.

Removing the workspace membership rule #
To manage membership in the desired workspace, access the desired workspace first and navigate to the Workspace members tab. Then:
- Click the three dots icon, then select Remove.
- Click the Yes button to confirm the action.

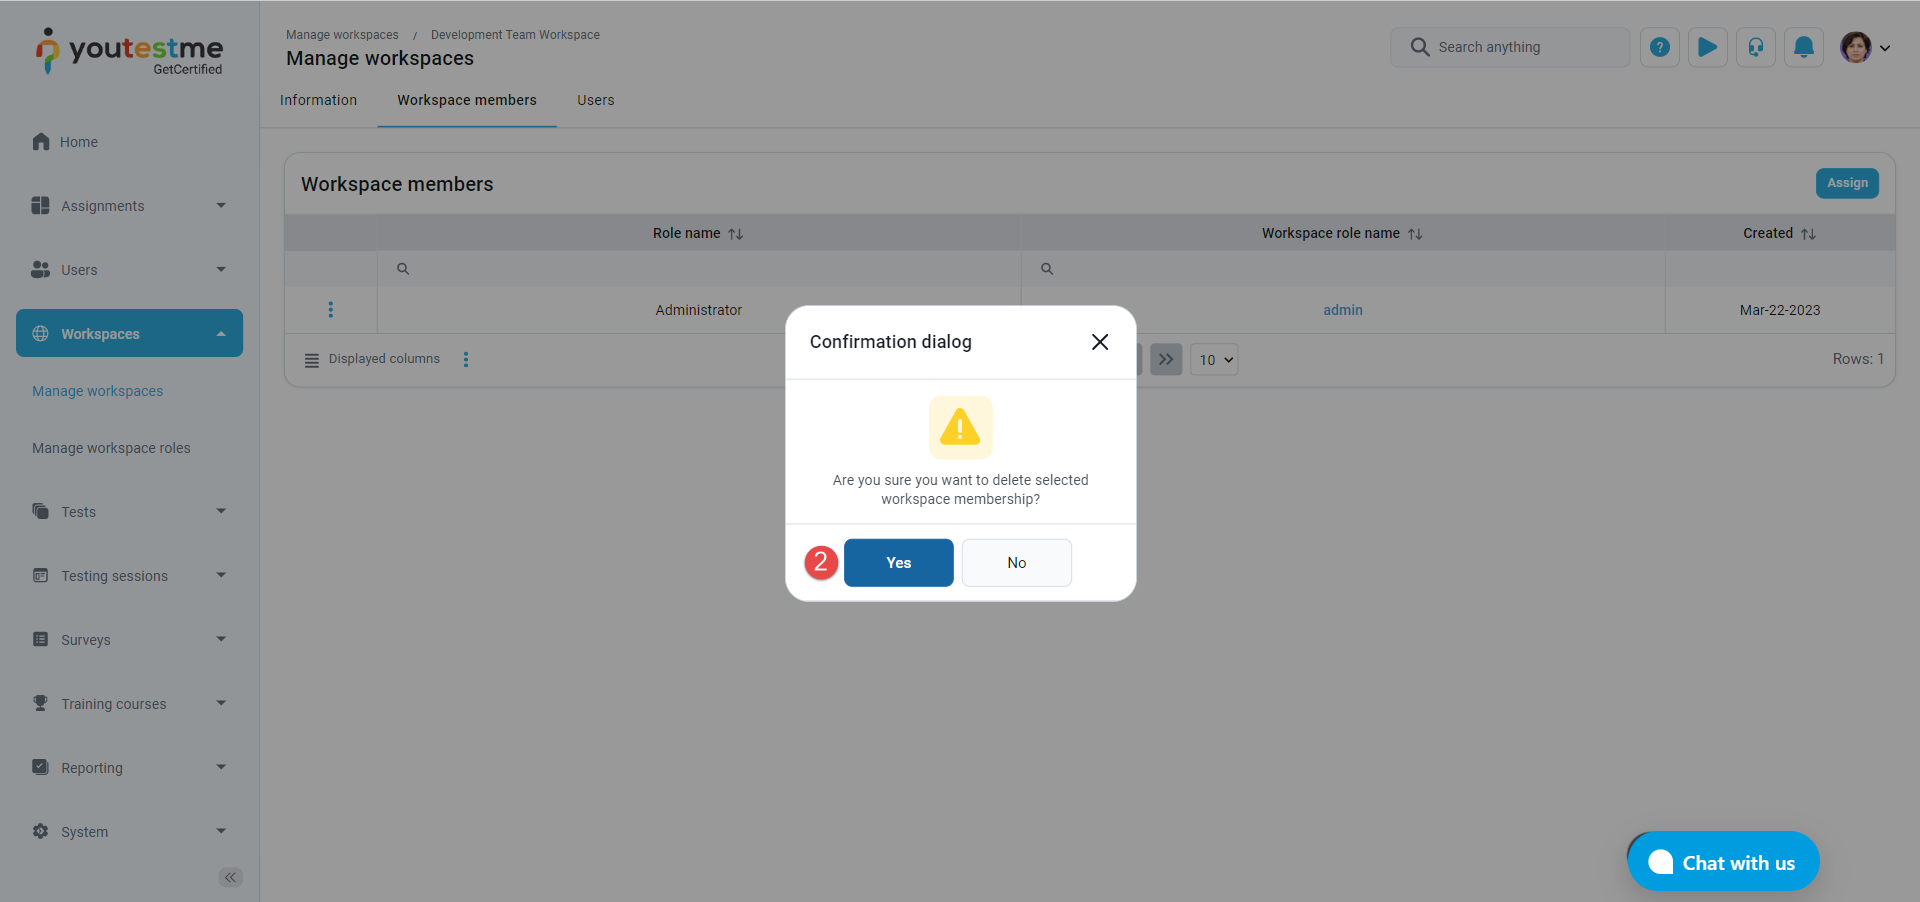
This way, all members who had removed roles will be removed from the workspace.
Removing locally assigned users #
Under the Users tab, you can view the list of all workspace members, both locally assigned and inherited. The inherited members are automatically assigned to a workspace when a membership linked to their role is created, while the local members are assigned individually from the list of all users.
The table of workspace users can be filtered to display the following:
- All users with access – Display all members of the workspace.
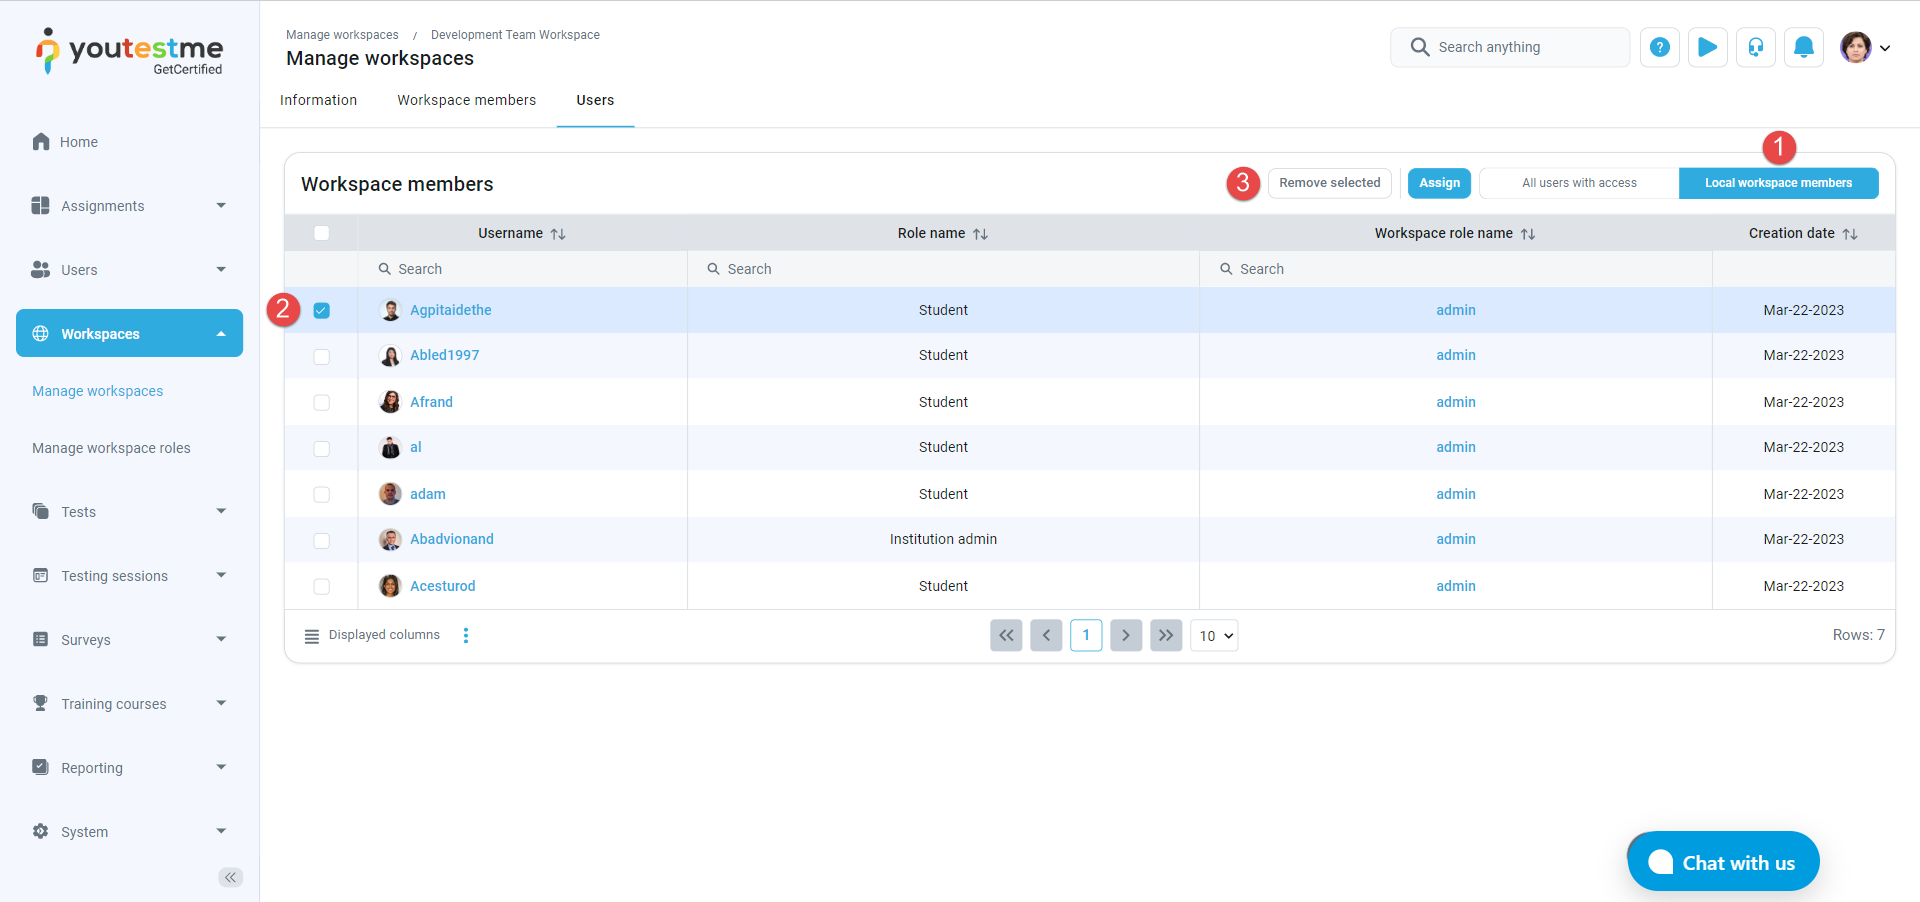
- Local workspace members – Display all locally assigned members and actions for their management.

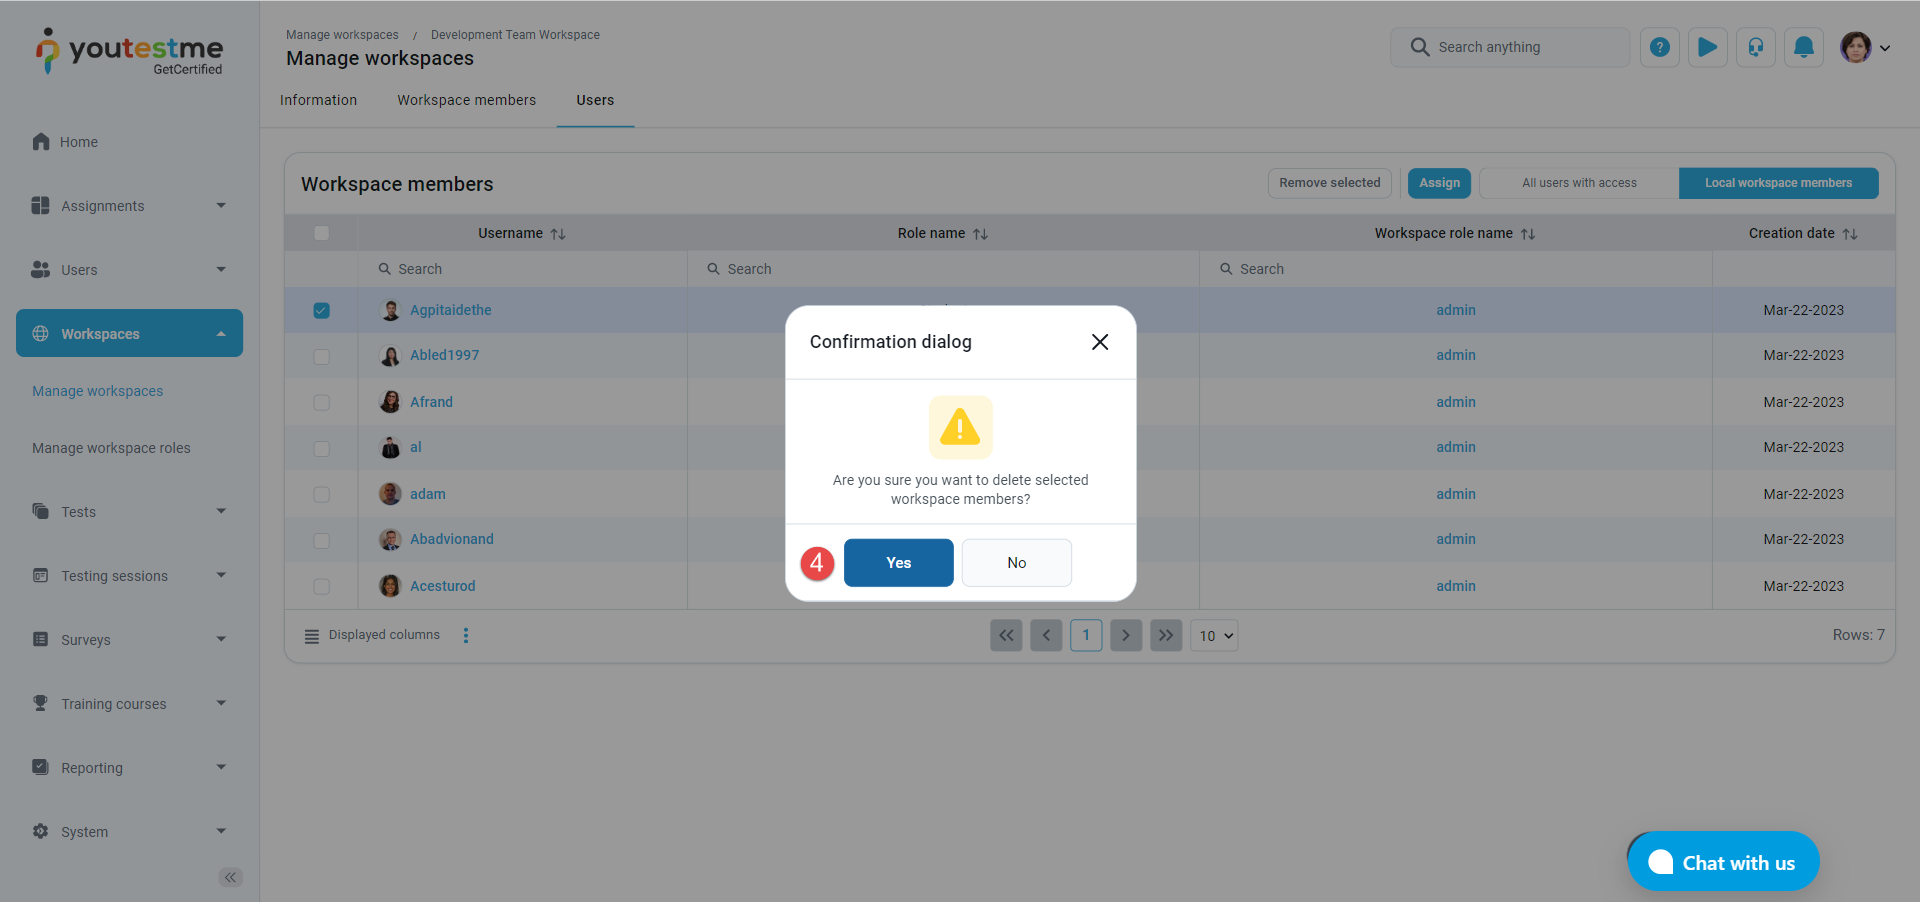
To remove the local members:
- Open the Local workspace members table.
- Select the members you wish to remove.
- Click the Remove selected button.
- Click the Yes button to confirm the action.
Adding training courses, surveys, or tests to a workspace #
Training courses, surveys, and tests can be added to different workspaces. These entities are visible and accessible only to the managers and members of the chosen workspace. To add a workspace to the desired training course, survey, or test, select it from the Workspace section found in the Information tab of the desired entity.
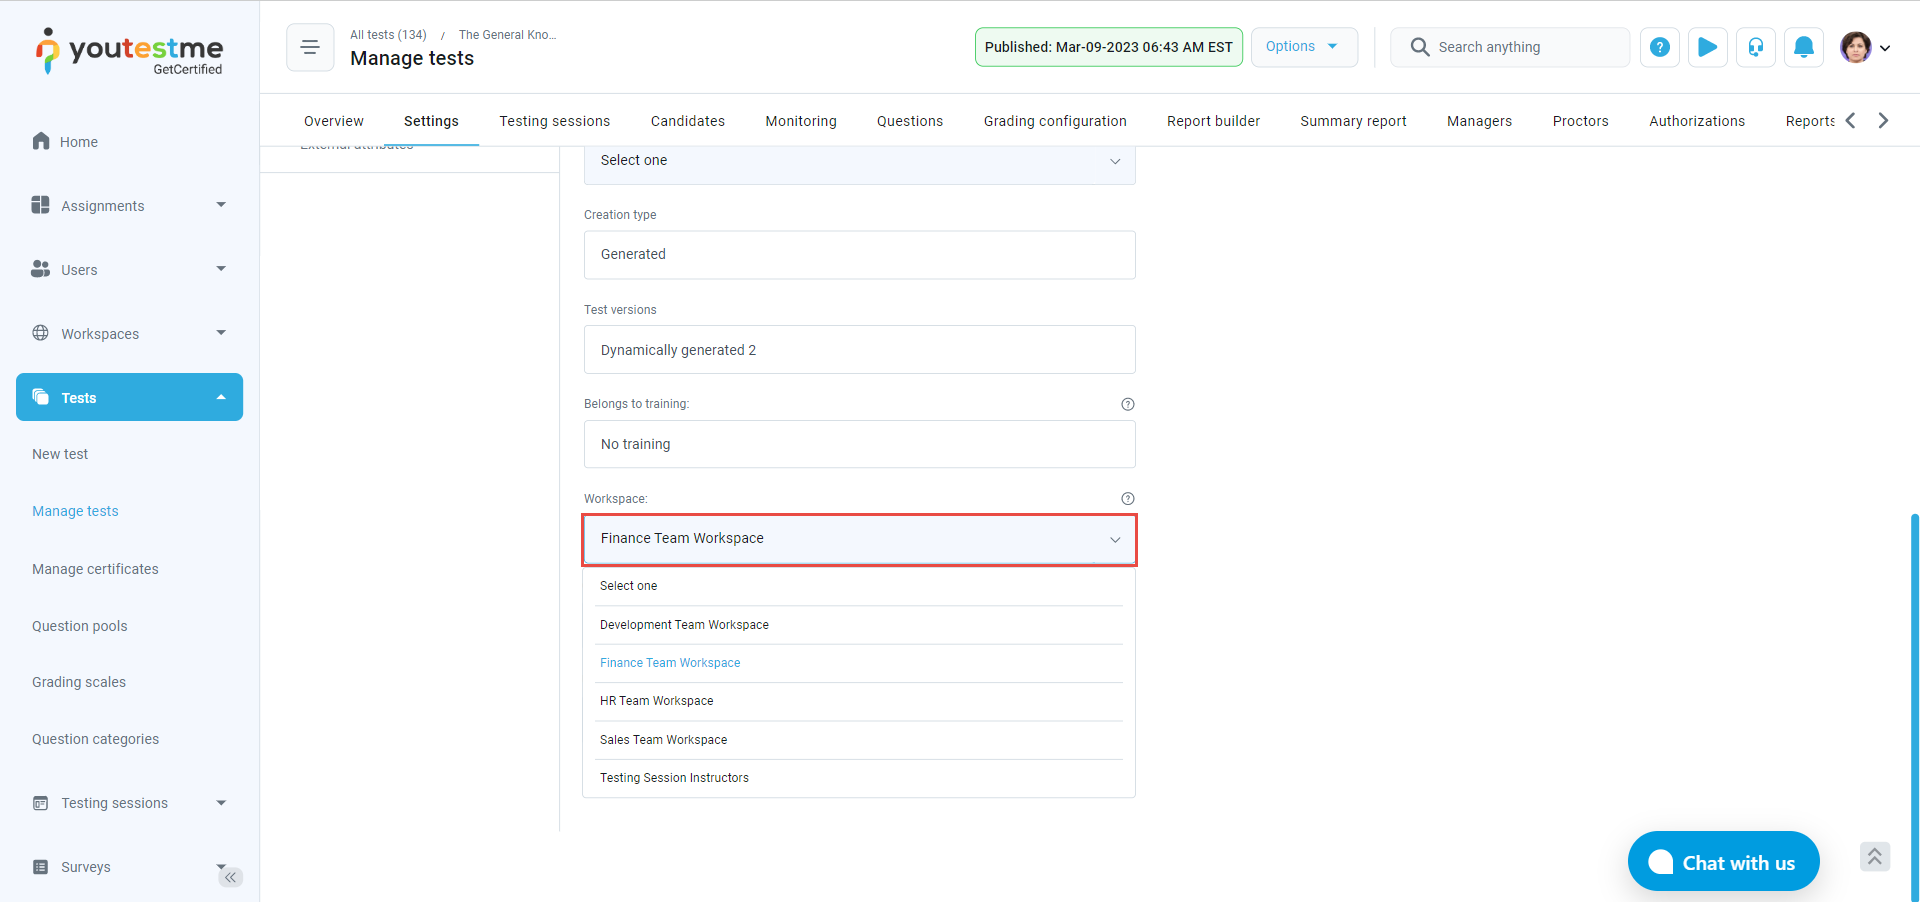
These entities can be reassigned to a different workspace at any time. Available workspaces that can be assigned depend on the user’s permissions.
Report on Workspace Activities #
In this section, we will explain how to use the report on workspace activities to track and analyze the usage of resources within each workspace. The report provides insights into the number of various entities within each workspace.
The report on workspace activities allows super administrators to access and compare individual reports for each workspace. This report provides information on the following:
- The number of tests, surveys, training courses, user groups, question categories, and test pools within each workspace.
To access this report:
- Navigate to the “Reporting” section in the left-side menu.
- Click “Predefined reports”.
- Select “Workspace reports”.

Open the report titled “Number of entities per workspace”.

The report displays the number of various entities within that workspace, providing you with a clear overview of its content.
- In this report, you can see each Workspace’s name and description. Additionally, you can observe the Number of test attempts, Number of tests, Number of surveys, Number of training courses, Number of user group groups, etc.
- Furthermore, this report allows you to filter and display workspace statistics within the desired time range.
- You can also schedule the report to be generated automatically. For more instructions on how to schedule the sending of reports, please refer to this article.

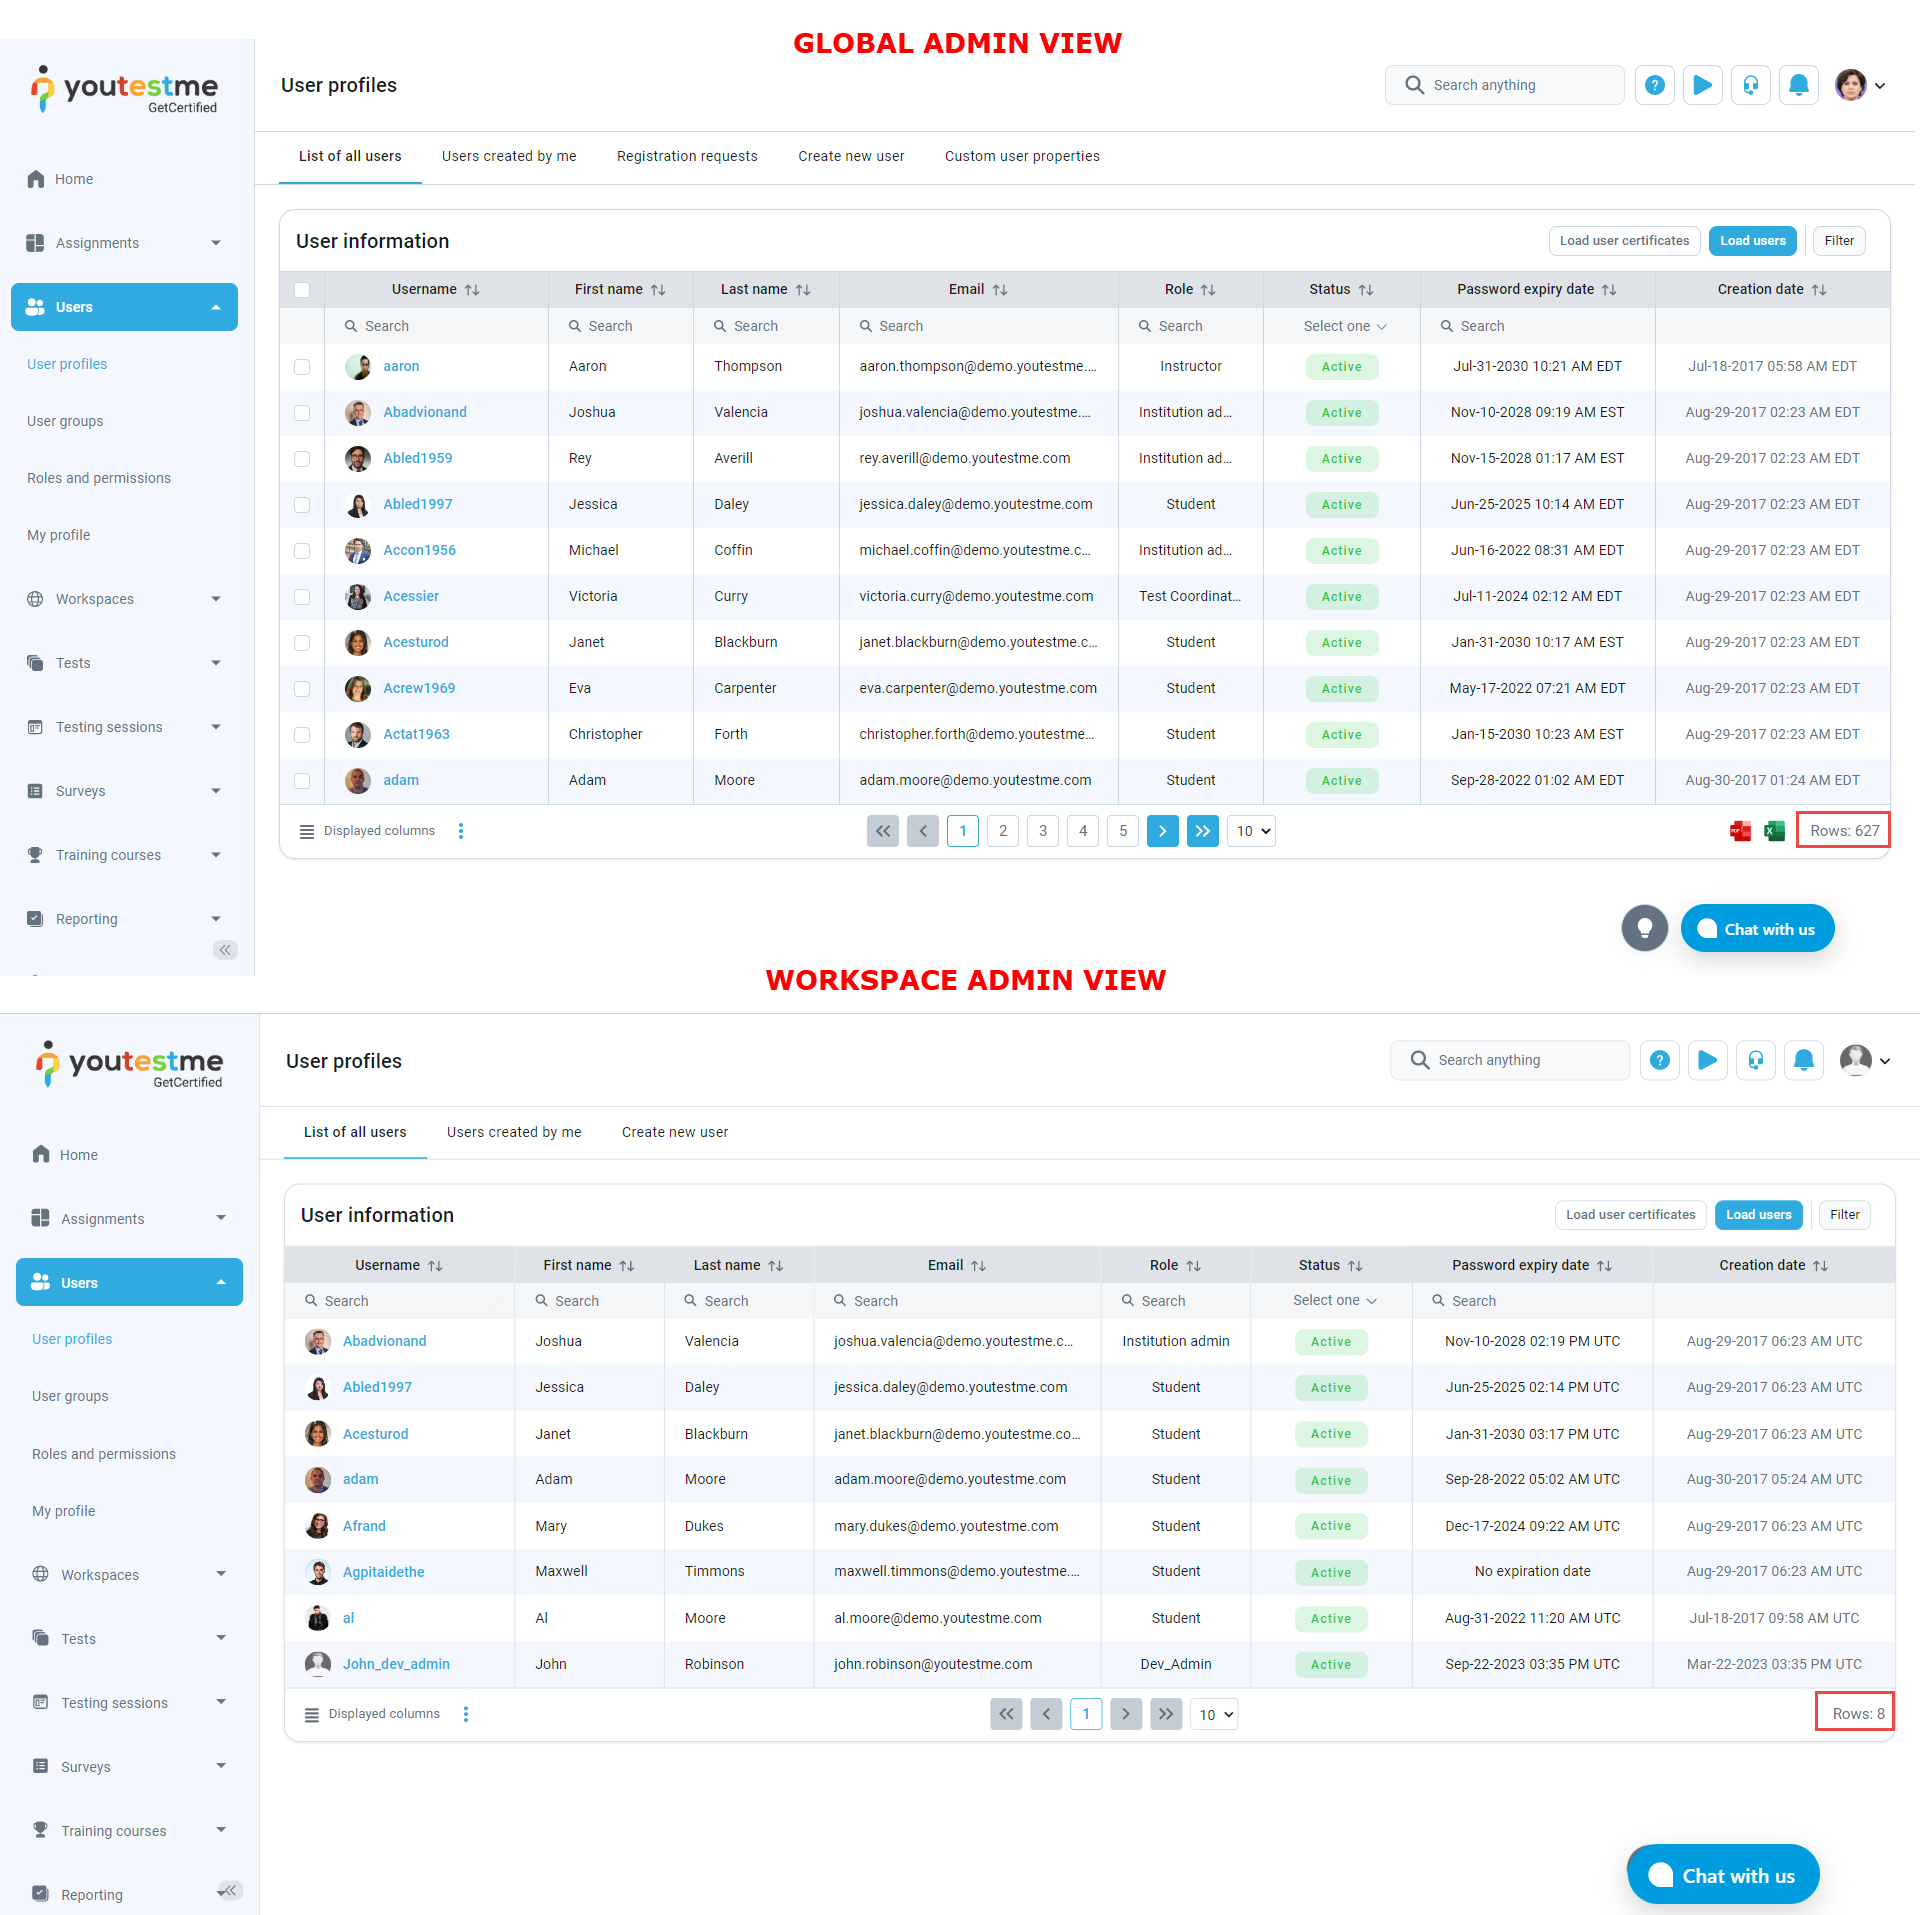
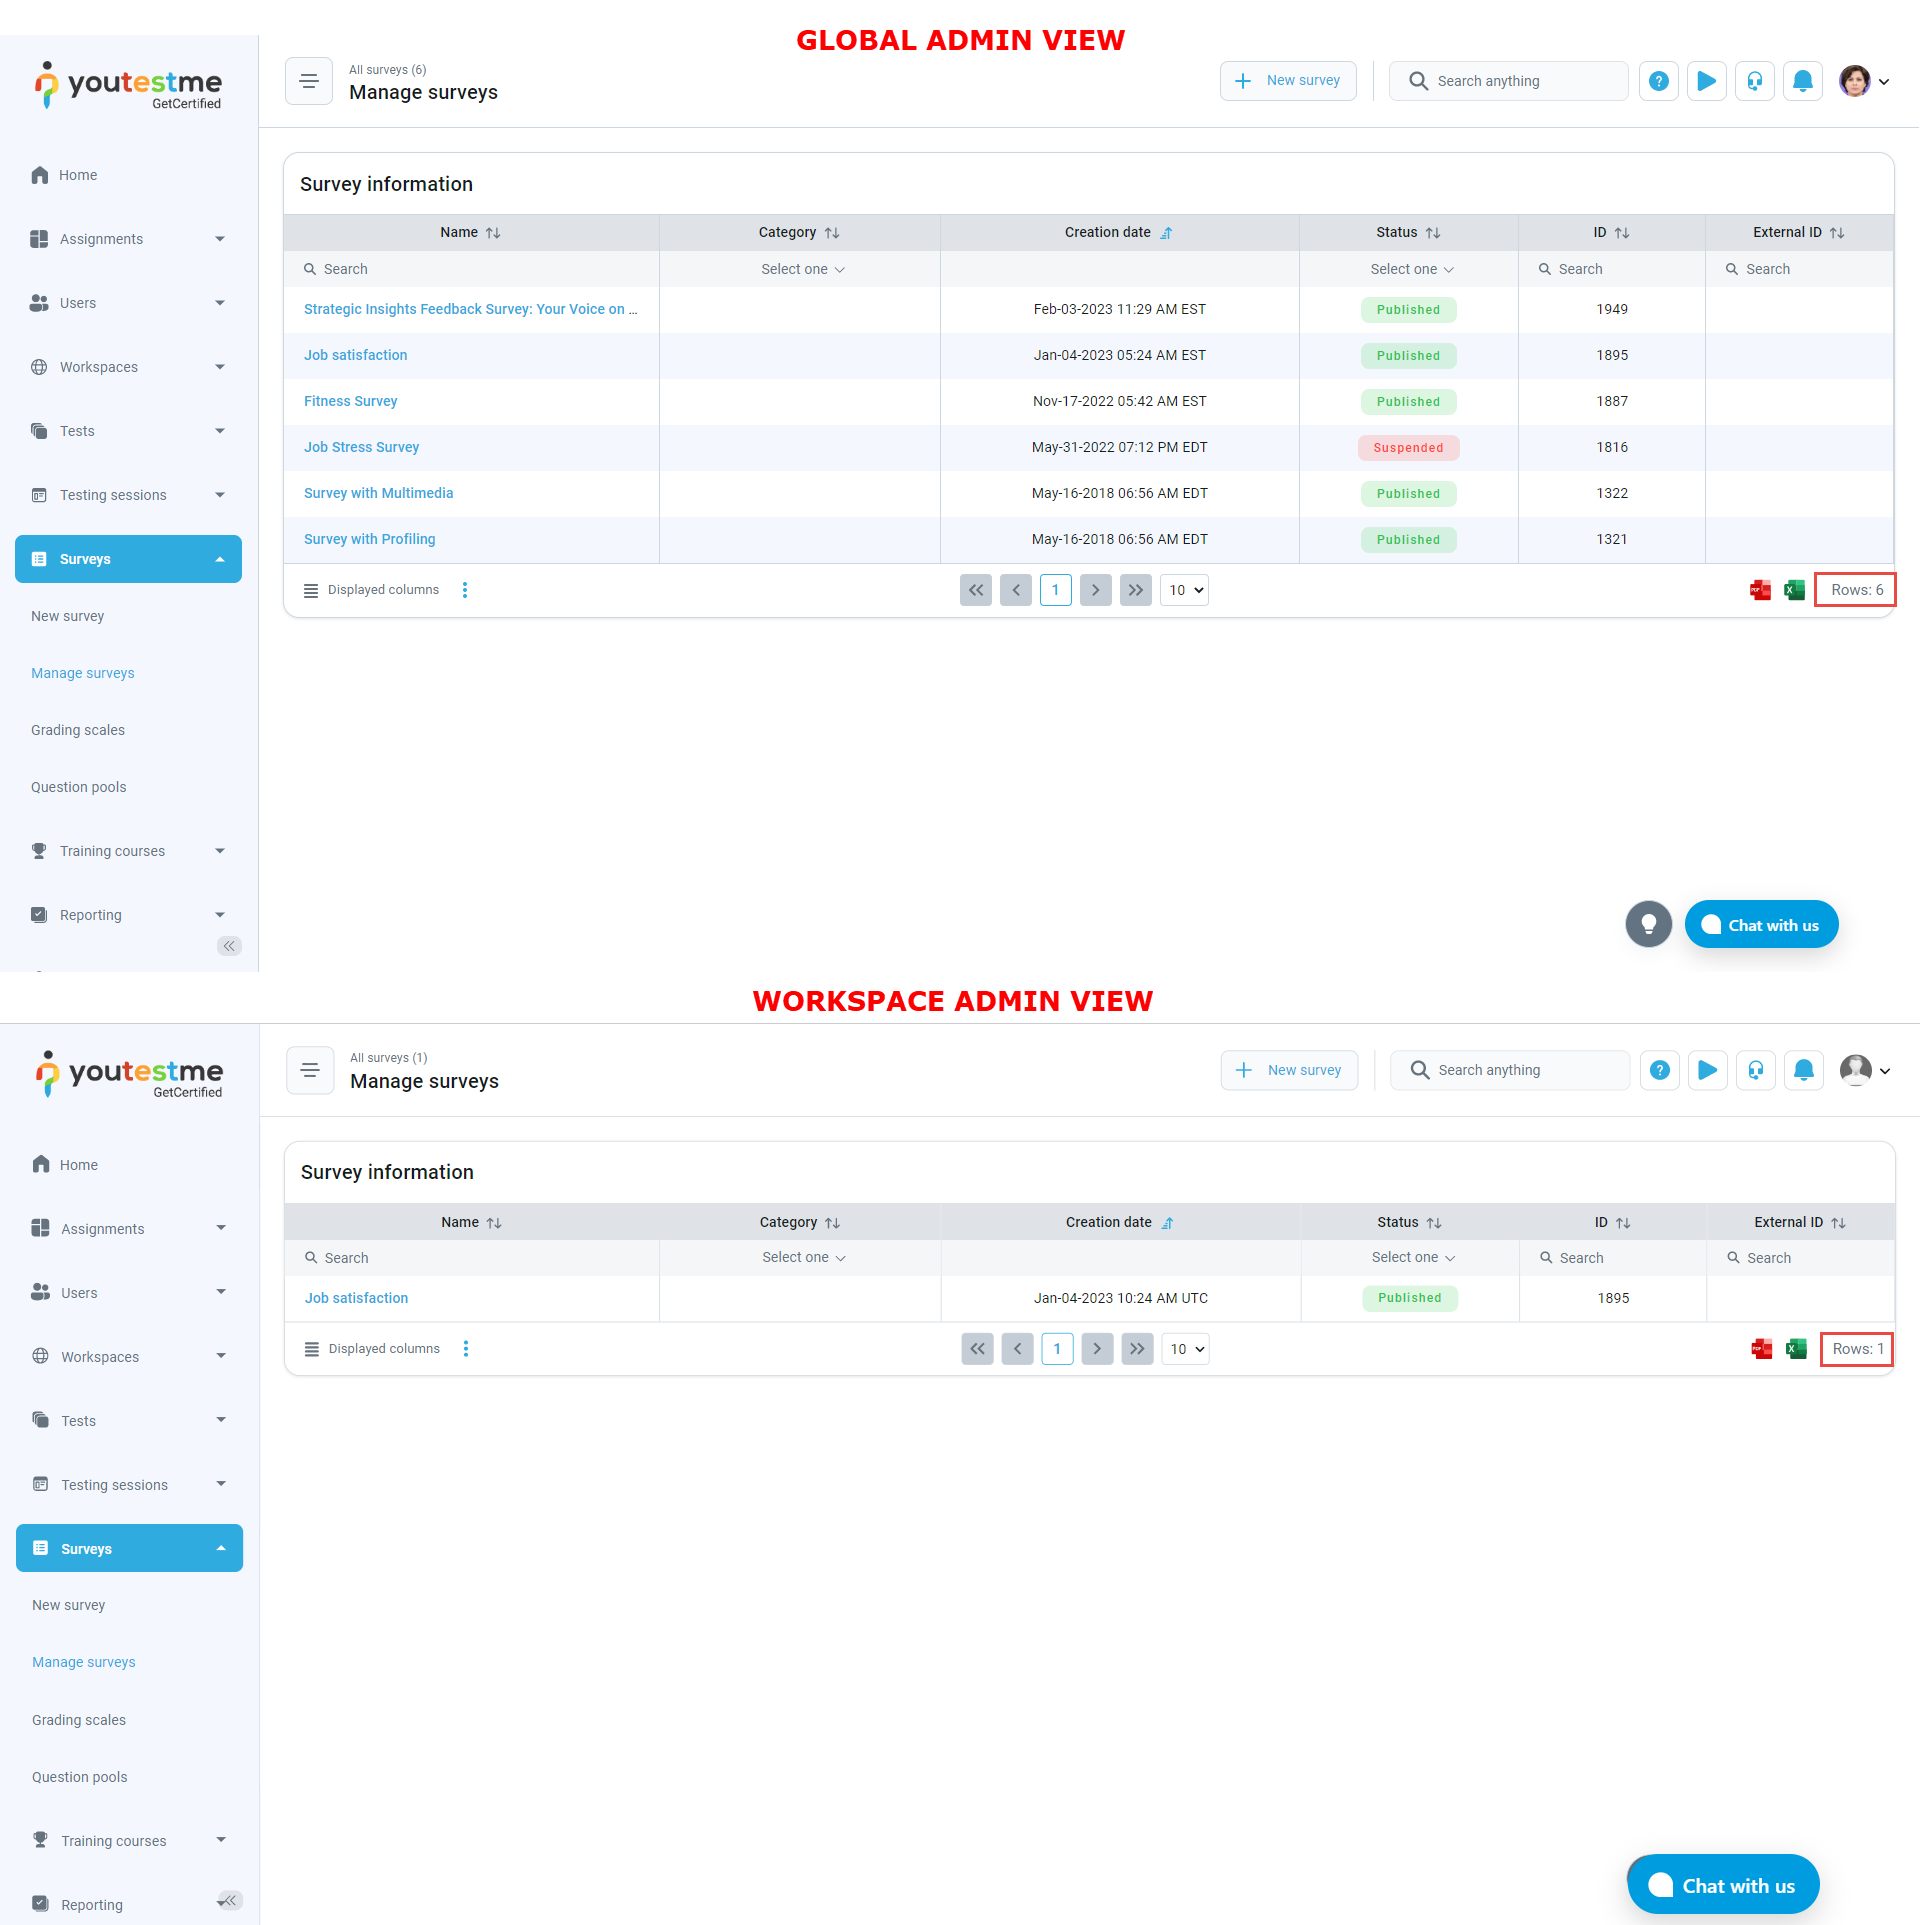
Global admin vs. Workspace admin view #
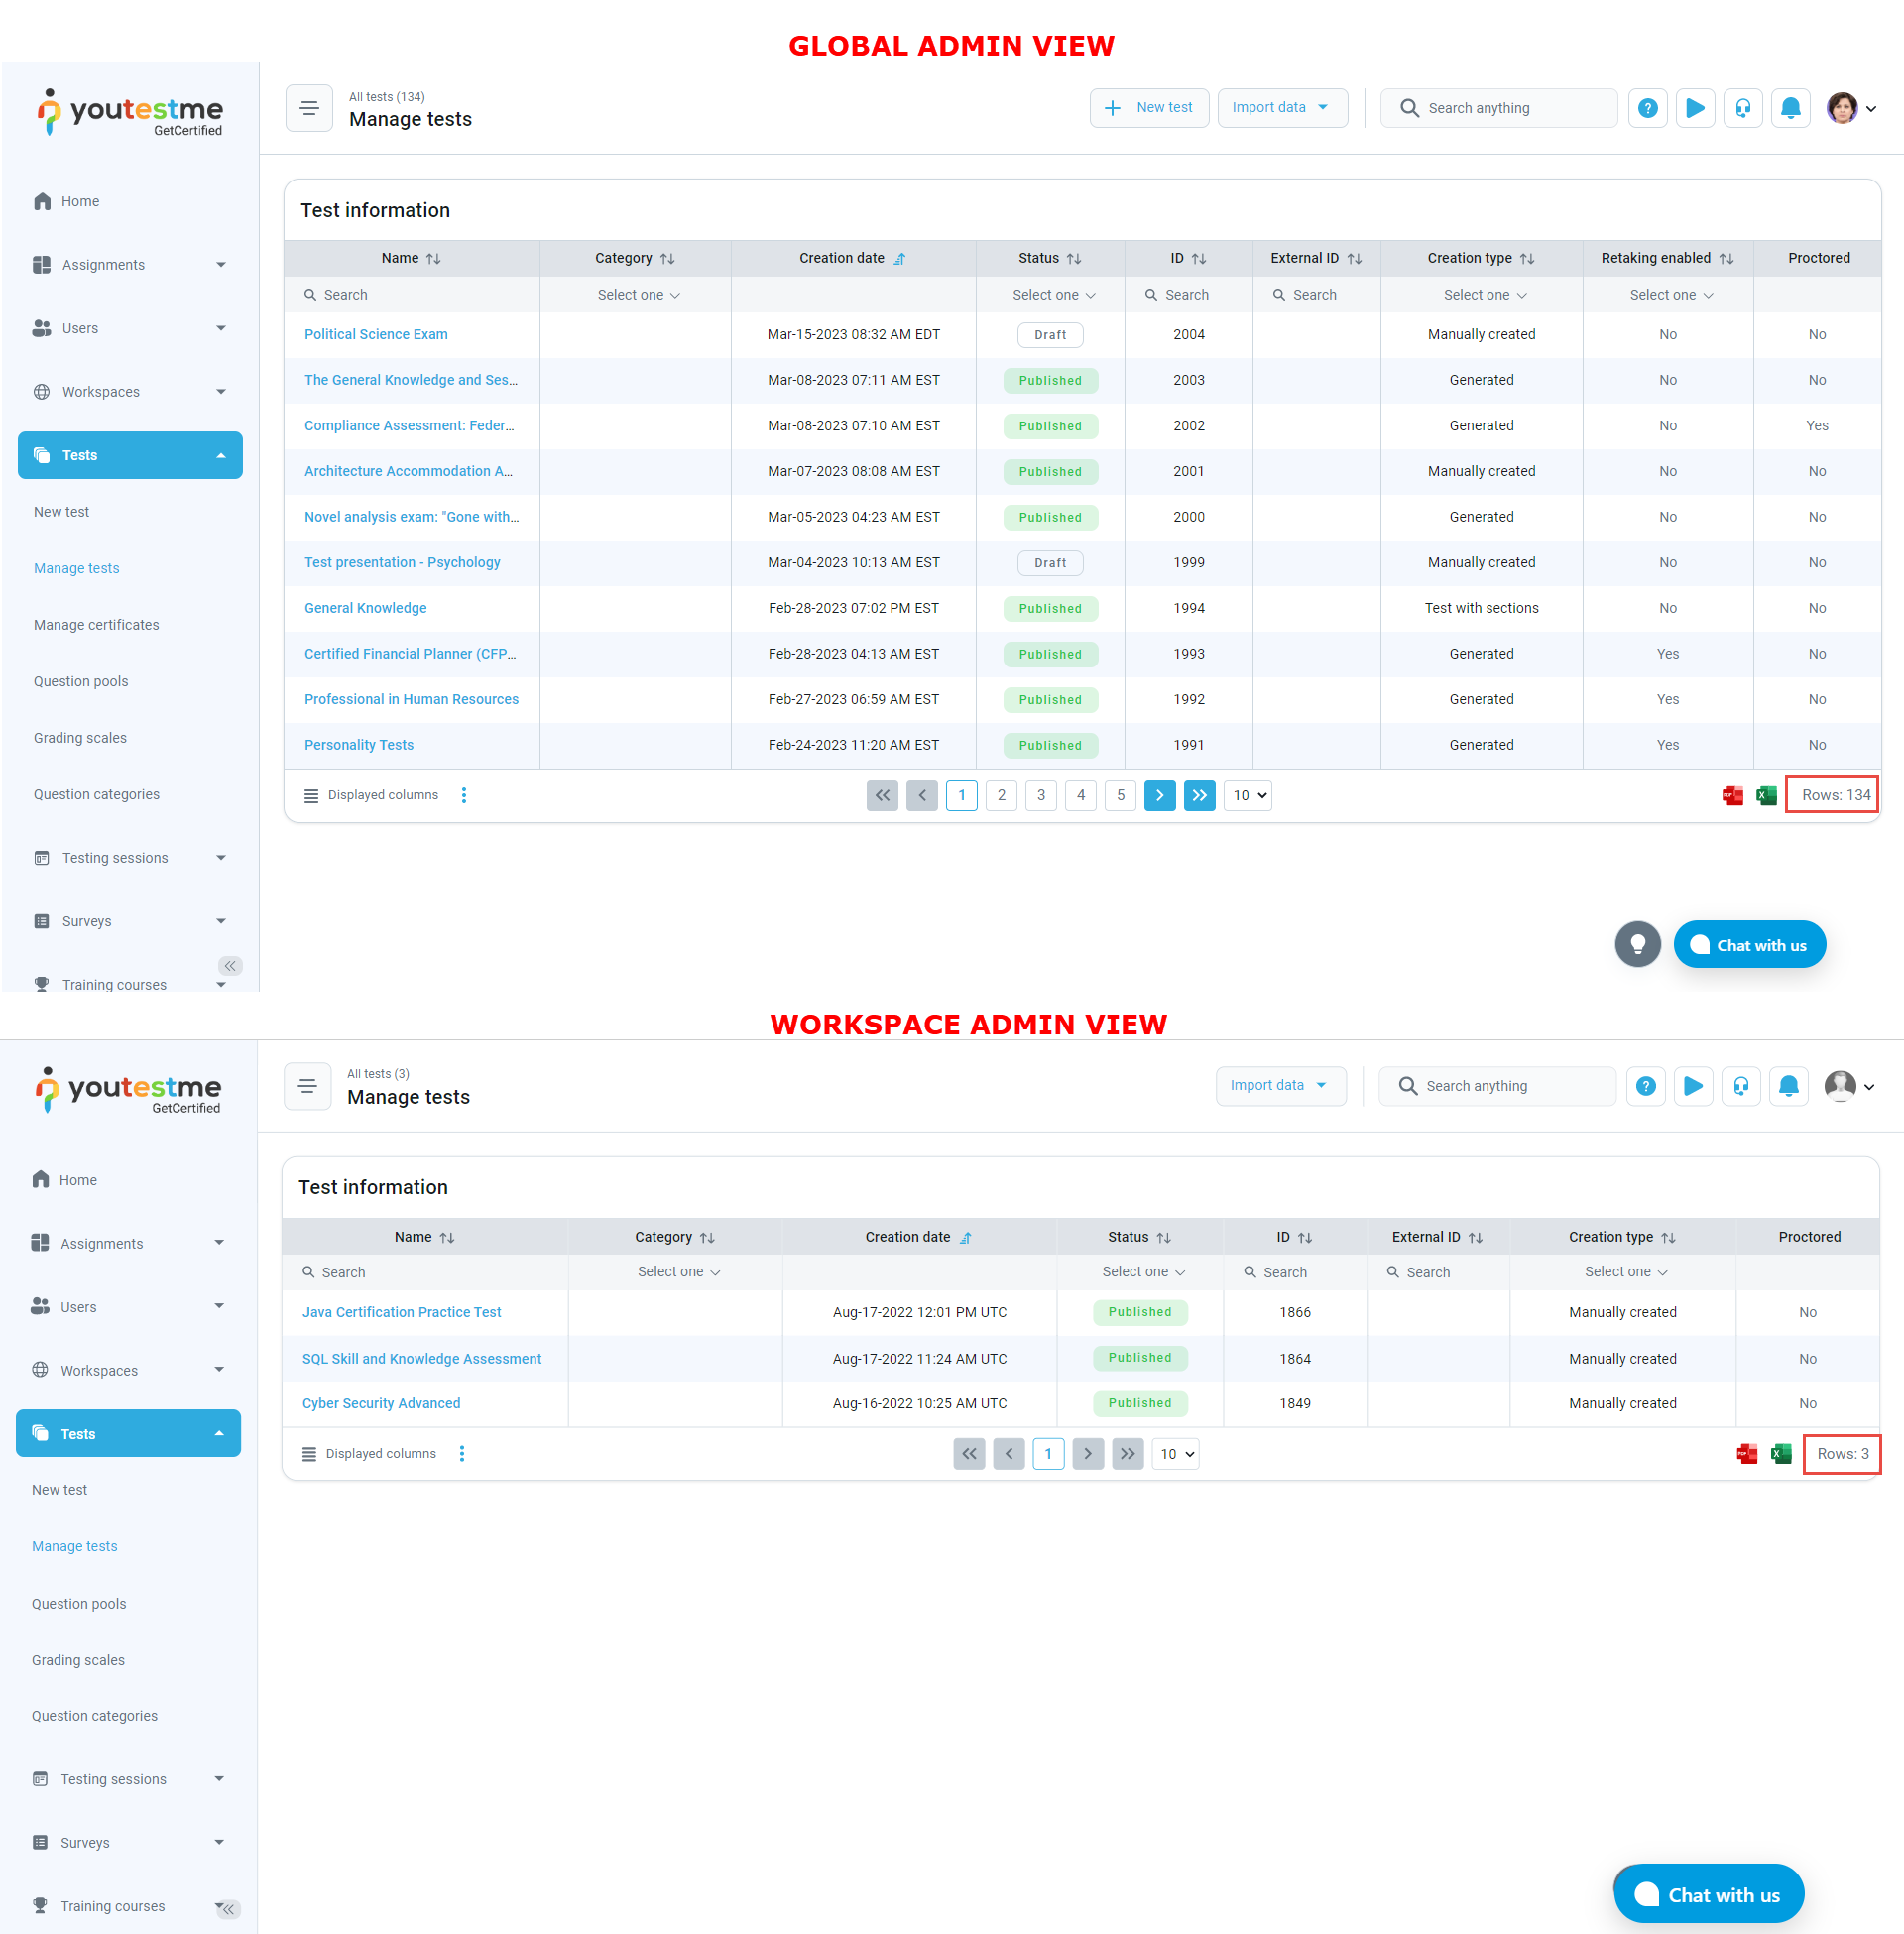
When accessing the application, the workspace admin (with the permissions shown above) will see the following:
- List of the users who are assigned to the workspace (both locally assigned users or assigned based on their role).

- List of tests assigned to that workspace.

- List of surveys assigned to that workspace.

- List of training courses assigned to that workspace.


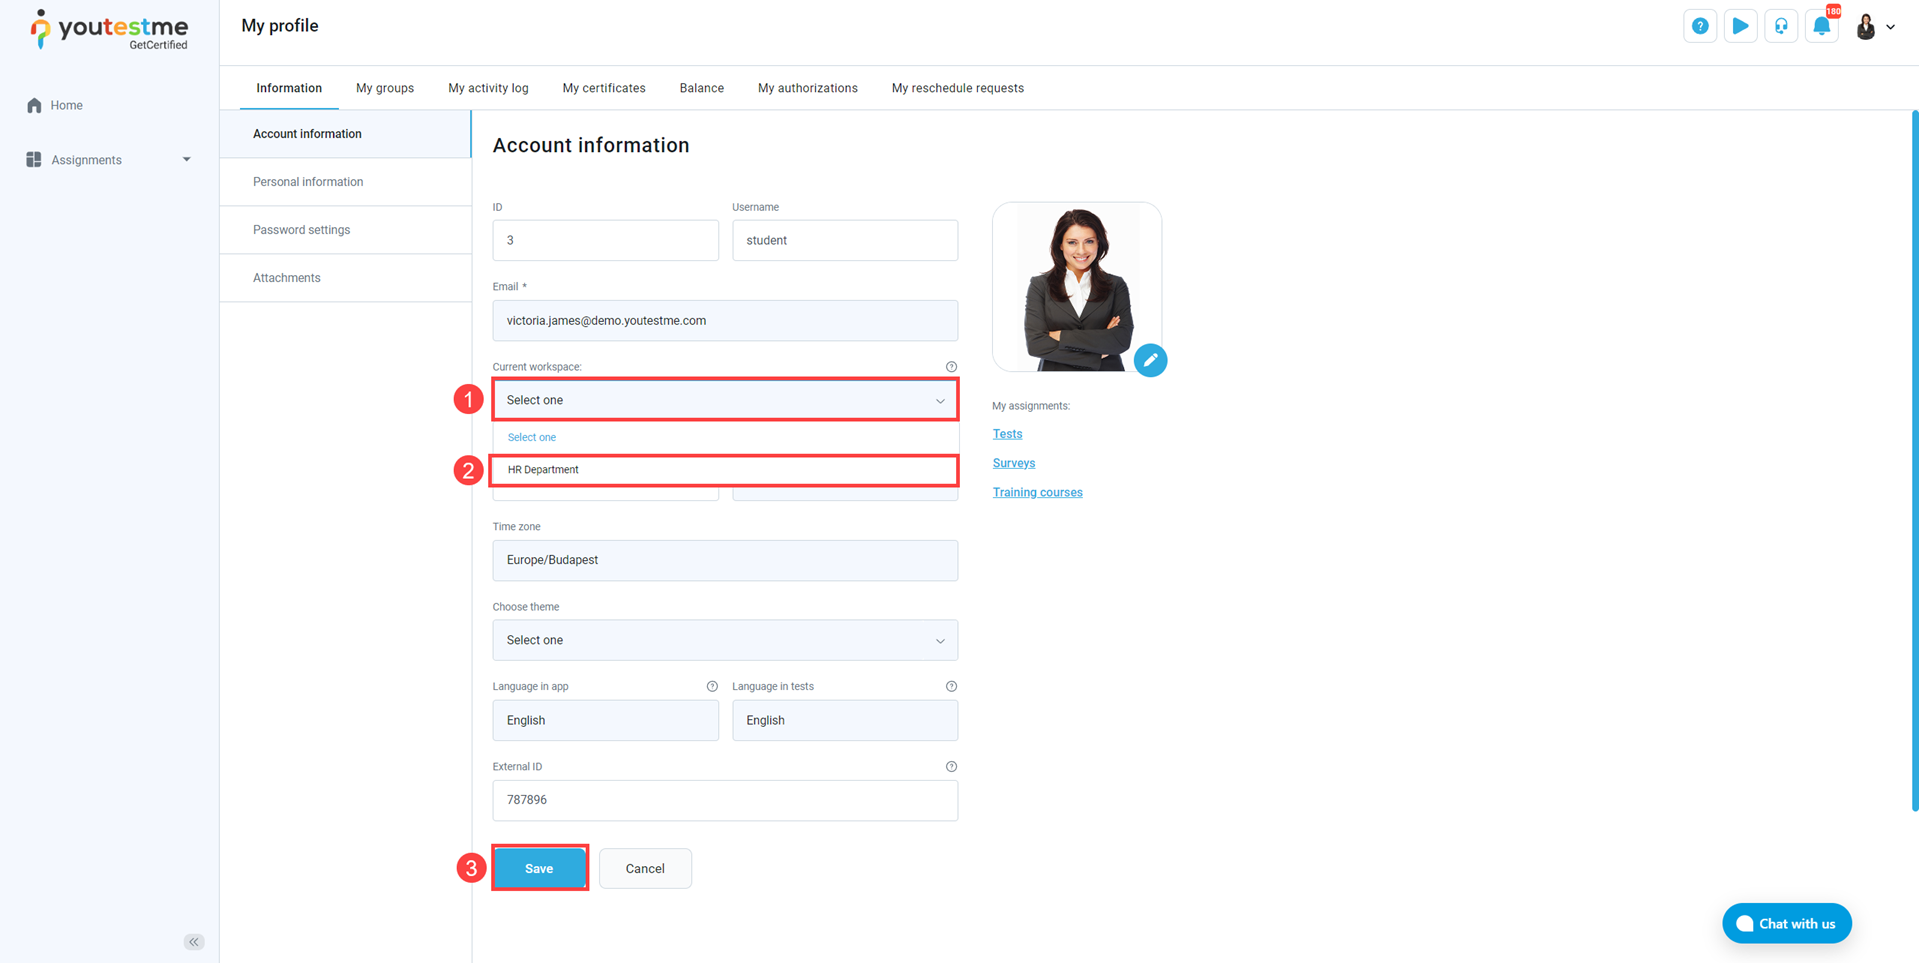
Choosing a workspace #
To choose a workspace, you need to access your profile in YouTestMe GetCertified by clicking your avatar in the top right corner and then take the following steps:
- Click the Select one under the Current workspace dropdown field.
- Find the workspace to which you can access.
NOTE! Workspace administrator is responsible for predefining the roles that have access to a particular workspace. In case you don’t see any workspace in your profile, please contact your workspace administrator. - Click the Save button
 Favicon is changed, but you don’t see it? #
Each workspace can use it’s own theme, including different colors, logo, and favicon. Sometimes when you opt-in to a particular workspace, you will not see these differences. In order to see changes, please take the next steps:
- After opting into a workspace, sign out from the application
- Enter your credentials
- Click the Log in button
Now you will see the logo and favicon of your workspace.


